



Charlie Ngo
•
Last updated: 7 October, 2026
Shopify Product Configurator: 2D vs 3D, Best Apps & Costs (2026)
Shoppers hesitate to buy a $1,200 sofa or a custom ring when they can’t see the exact version they’re...
How To Set Up Shipping On Shopify: A Step-By-Step Guide (2026)

Marketing Manager
Summarize this post with AI
Picture a shopper who adds to the cart, reaches checkout, sees the shipping cost, and closes the tab. It happens constantly. Unexpected extra costs like shipping are the number one reason shoppers abandon checkout, which makes your shipping setup a real conversion rate lever, not a back-office task.
In this blog post, I’ll show you how to set up shipping on Shopify the right way, from locations, profiles, zones, and rates to free shipping, plus the rate strategy most tutorials skip. I’m Charlie Ngo, an eCommerce expert at BOGOS, and across 11 years of helping stores lift sales, AOV, and conversion, I’ve set these exact screens up more times than I can count.
Before you open the shipping settings, get familiar with the parts that make up a Shopify shipping setup. Each one plugs into the next, so knowing how they fit makes the steps below fast.
With the parts clear, here is how to set them up.
Everything lives in one place: Settings → Shipping and delivery. You work top down: location, profile, zones, rates. Follow these five steps in order.
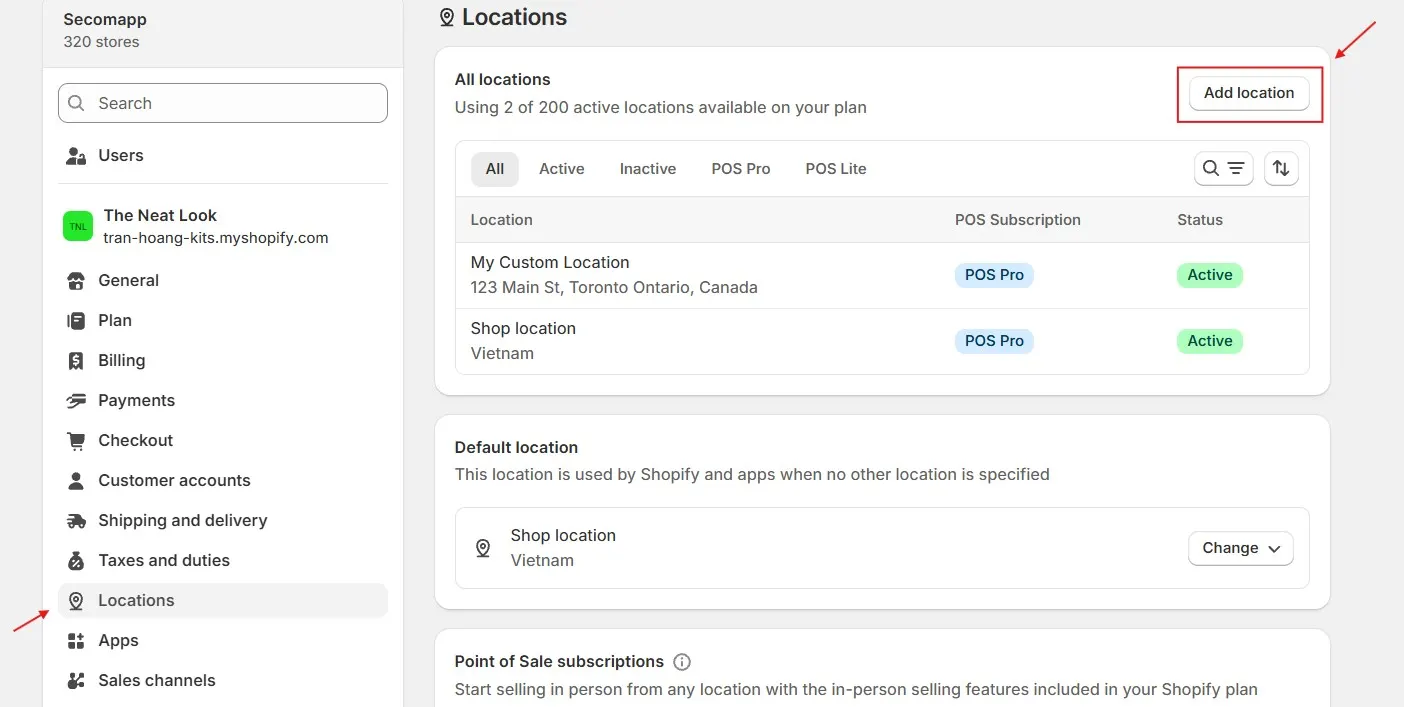
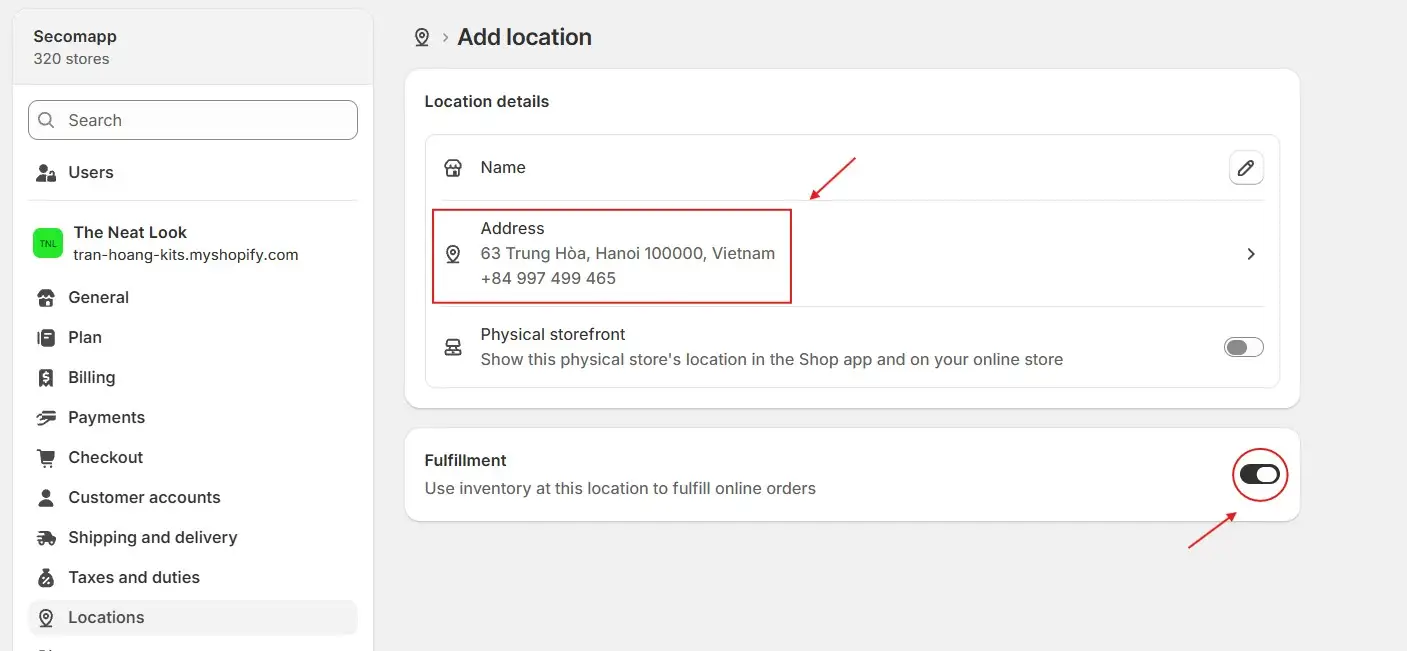
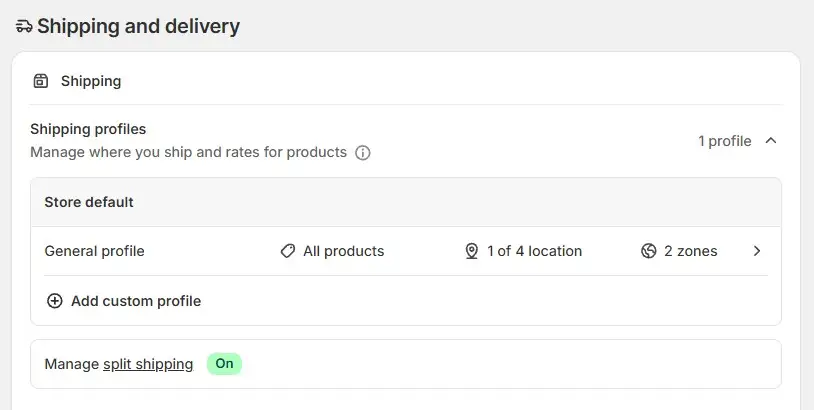
Keep these two rules in mind:
A shipping zone is a group of countries or regions that share the same rates, like North America or Europe.
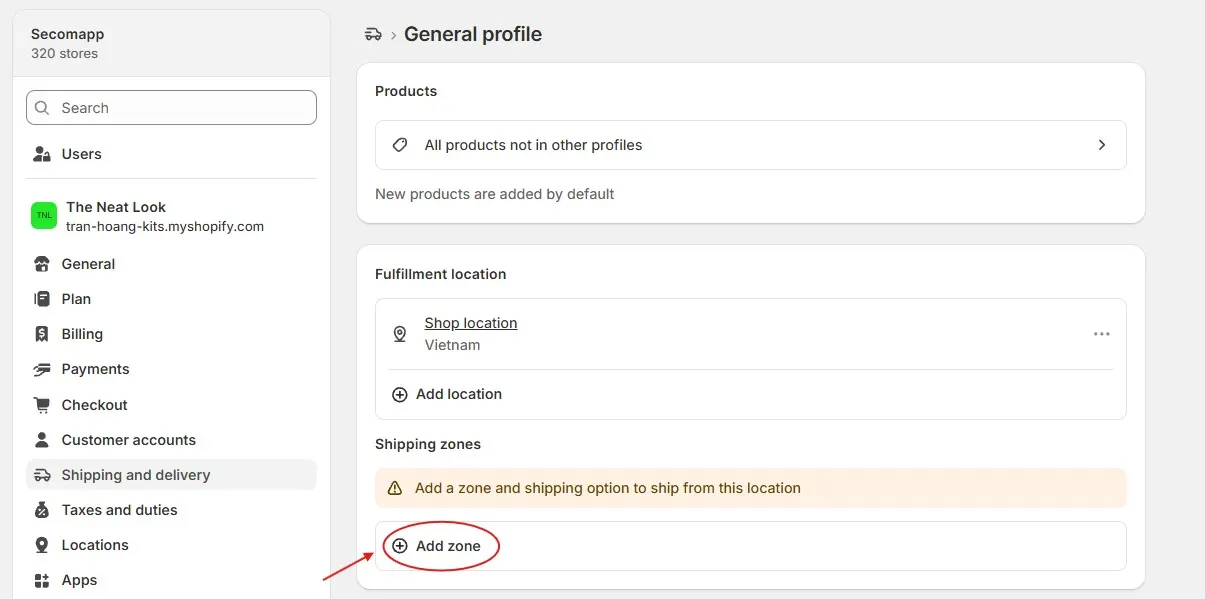
Two gotchas from Shopify’s own docs:
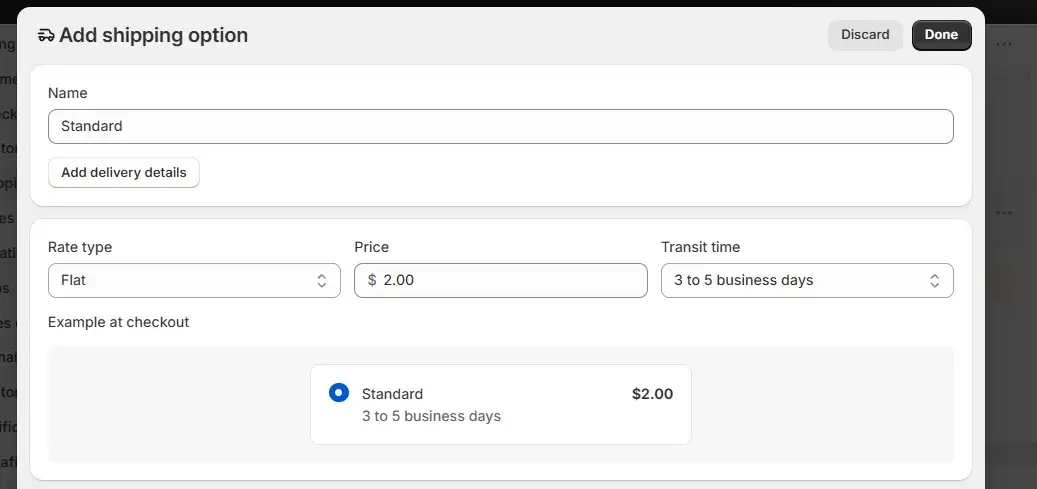
Shopify has four rate types: flat, price-based, weight-based, and carrier-calculated, with free shipping as a switch on any of them. Each one is broken down in the rate types section below, so pick the fit for your products.
Never skip this.
Two minutes here saves you from a broken checkout on launch day.
Shopify has four shipping rate types, here is what each does and when it fits.
One fixed price per order, best when your products are similar in size and weight. Do the math so you do not lose money: a one-pound T-shirt shipped USPS Ground Advantage runs about $5.50 on Shopify’s discounted rate, and Shopify negotiates carrier discounts of up to 88% with USPS. Add roughly 50 cents for the label and packaging, charge $7.99 flat, and you keep a small margin while showing a friendly number.
Charge by cart value, more on small orders and less on big ones. Shopify’s example: $24.99 for orders up to $100, $9.99 from $100 to $200, and free above $200. It is a natural on-ramp to a free shipping threshold.
Charge by how heavy the order is, which fits when weight drives your real cost. Shopify’s example: $4.99 up to 1 pound, $9.99 from 1 to 5 pounds, and $19.99 from 5 to 10 pounds. Every product needs an accurate weight, or the rate will not calculate at checkout.
Show live rates from the carrier based on weight, size, and destination, so the customer pays close to the real cost. In the US, USPS, UPS, and DHL are built in on every plan; connecting your own carrier account needs a higher plan or a small add-on. Best for a wide or heavy catalog where flat pricing would leave you covering the gap. For the full setup, which plan you need, which carriers connect, and how to keep quotes accurate, see our guide to real-time shipping rates.
Most carts hold more than one item, and Shopify counts them together, so the shipping fee at checkout can climb higher than you expect, especially when items span different shipping profiles or locations.
For orders mixing very different weights or sizes, two moves keep rates fair:
When native rates cannot express your rules, like per-item pricing, postcode-level rates, or logic across several carriers, a third-party app fills the gap. The top-rated choices on the Shopify App Store are ShipX for custom rules at scale, Intuitive Shipping for fine control over how rates are calculated, and ShipZip for zip-code and local pricing.
The trade-off is another monthly cost and one more app to maintain, so add one only when native rates genuinely block you.
For a detailed guide, read: Shopify Shipping Rates for Multiple Items (2026 Guide)
Free shipping is not a fifth-rate type. It is a switch you add to any of the four above, and it does more against abandoned carts than any other rate choice, as long as it does not quietly drain your margin. A free shipping threshold, free delivery above a set order value, is the version worth planning: it removes the surprise cost and nudges shoppers to add one more item, so it lifts conversion and average order value from the same setting. There are two ways to run it.
You have three native options:
To set the first two, add or edit a shipping option, tick Offer free shipping, and enter the qualifying amount. Price the threshold with intent: set the bar at about 1.3 times your current AOV, a reach rather than a leap, close enough that nearly 40% of shoppers can realistically clear it by adding one more item. Too low and you give away margin; too high and they give up.
The native free shipping setup has two real limits:
A third-party app like BOGOS: Free Gift Bundle Upsell fixes both with two features that work together:
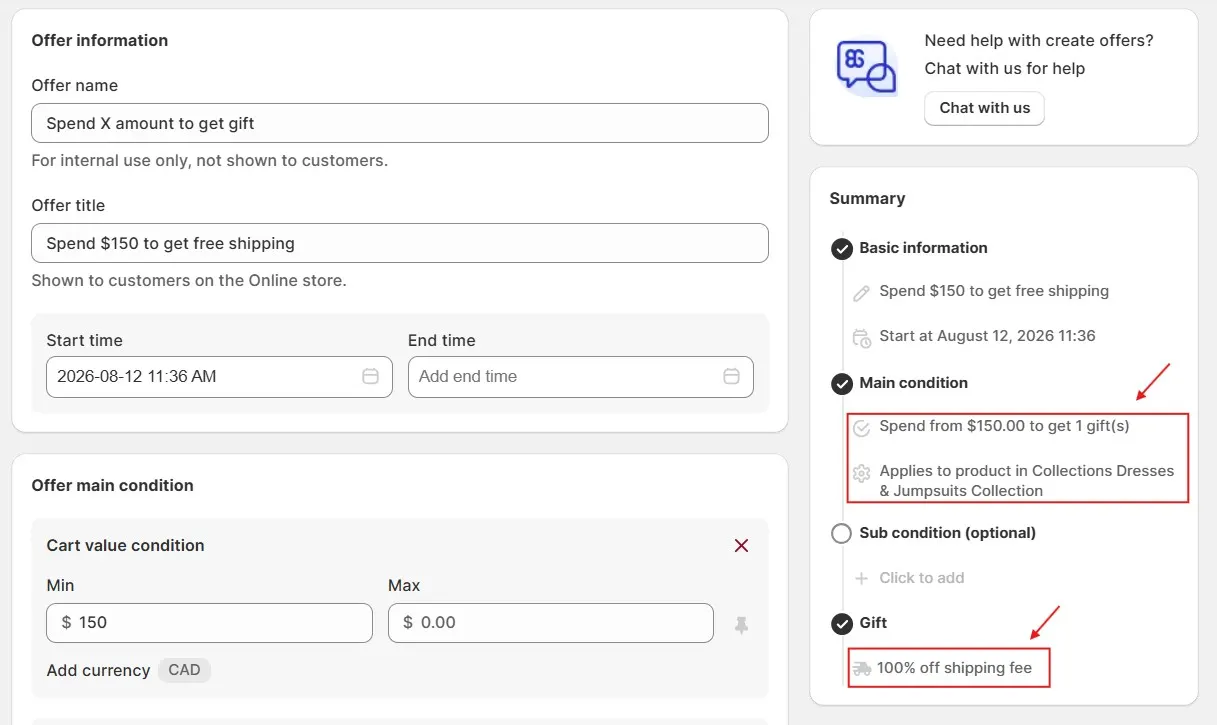
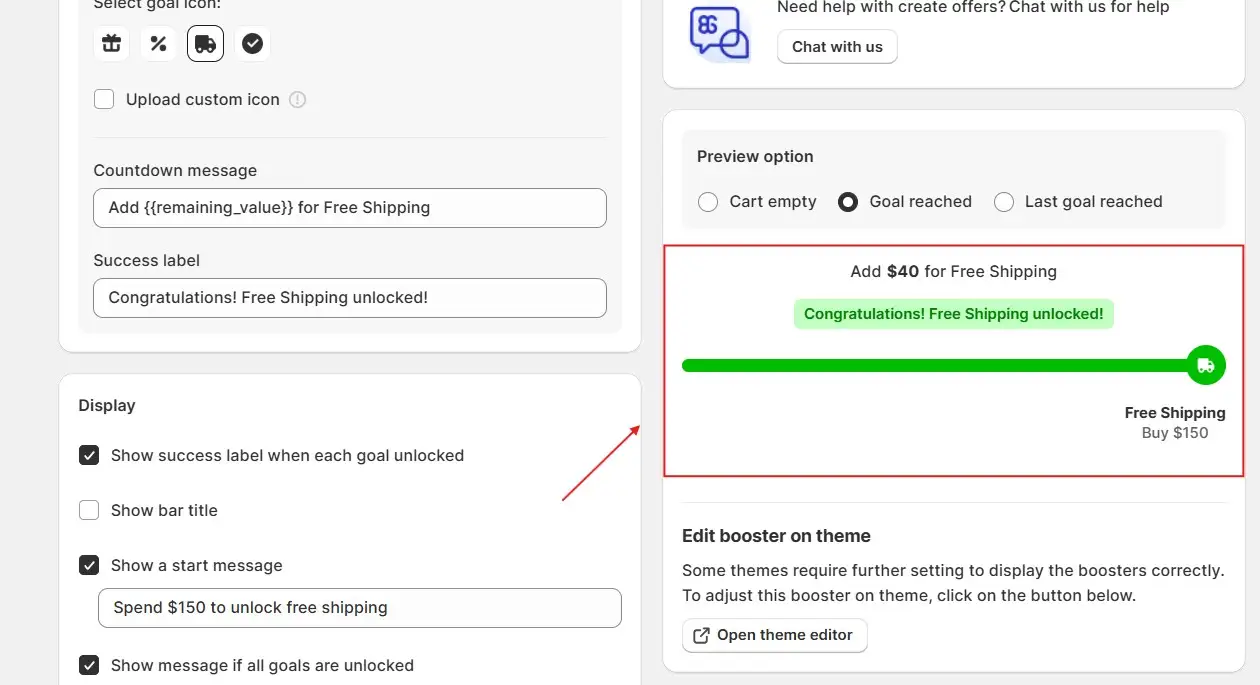
Caution: If you run Shopify Plus and set up free shipping or checkout logic with Shopify Scripts, mark two dates. You can no longer edit Scripts after April 15, 2026, and they stop running entirely on June 30, 2026, per the Shopify developer changelog. Shopify Functions replaces them for shipping and discount logic. Native threshold rates and apps are not affected, so this only matters if custom Scripts power your shipping today.
Selling internationally builds on the same setup as the guideline I wrote above, with some extra steps. For the full walkthrough of markets, duties, HS codes, and customs forms, see our guide to how to set up international shipping.
The sale does not end at checkout. The wait that follows shapes whether the customer trusts you and buys again, and clear tracking is how you protect that trust. Shopify handles most of it automatically once you fulfill an order.
Here is why tracking belongs in a conversion conversation. It removes the “where is my order” anxiety that fills your inbox and chips away at trust. A calm, transparent post-purchase experience turns first-time buyers into repeat customers, which is where much of your conversion rate growth actually comes from. Showing delivery estimates at checkout through Shop Promise also lifts buyer confidence before they pay, so tracking works for you at both ends of the order.
Tracking keeps buyers informed, but it cannot stop a parcel from being lost, damaged, or stolen on the way. For those cases, shipping insurance reimburses you for eligible shipments, so one bad delivery becomes a claim you can recover rather than a refund you fully absorb.
A test order is the fastest way to catch the small errors that quietly break checkout. Run through this list before you go live, and check each one with a real customer address, not just your own, since your home address often sits in a favored zone and hides gaps.
Pass all five, and your checkout is ready to take orders. Fix any that fail, then run the test again.
Shipping is the last thing a customer sees before they buy, so it deserves more care than a quick default. You now have the full path: add the location you ship from, set up your profiles and zones, then choose the rate type that fits your products, whether flat, price-based, weight-based, or carrier-calculated. Run one test order, and the setup is done.
The real win is strategy, not just mechanics. Unexpected shipping cost is the number one reason shoppers abandon a full cart, so a free shipping threshold set around 1.3 times your average order value turns that leak into a lift. Make it visible with a progress cue, and you protect conversion and grow order value from the same setting. That is how shipping stops draining sales and starts helping you boost your Shopify sales.
Go to Settings → Shipping and delivery, open the shipping option you want, tick Offer free shipping, and set a qualifying order amount if you want a threshold. Leave the amount blank for free shipping on every order.
Yes. Create a custom shipping profile, add only the products that need different rules, then set that profile’s own zones and rates. A product can belong to just one profile at a time.
Usually a missing product weight, a top tier with a maximum that the order exceeds, or a country that is not in an active market. Check those three first, then place a test order to confirm the fix.

Shoppers hesitate to buy a $1,200 sofa or a custom ring when they can’t see the exact version they’re...

Selling personalized products on Shopify gets hard the moment a shopper needs to type a name or choose a...

The UK is the largest eCommerce market in Europe and the third-largest in the world. For international Shopify stores,...