


Charlie Ngo
•
Last updated: 7 October, 2026
Shopify Product Configurator: 2D vs 3D, Best Apps & Costs (2026)
Shoppers hesitate to buy a $1,200 sofa or a custom ring when they can’t see the exact version they’re...
Shopify Product Customizer: How to Add One (3 Methods)

Marketing Manager
Summarize this post with AI
Selling personalized products on Shopify gets hard the moment a shopper needs to type a name or choose a fourth option. Shopify’s built-in variants stop at 3 options, and they cannot hold free text at all. This guide shows you 3 ways to add a Shopify product customizer, how to charge extra for custom options, how to make the options easy to use, and how to get every detail to your production team. I’m Charlie Ngo, Marketing Manager at BOGOS. I built this guide from Shopify’s Help Center and developer docs, live Shopify App Store checks on October 6, 2026, and a hands-on test of the no-code method on a Shopify test store.
A Shopify product customizer is a tool on the product page that collects a shopper’s personal choices before checkout. Those choices include engraving text, a gift message, an uploaded photo, a font, or extra options beyond size and color.
The shopper’s input stays attached to the item in the cart and the order. Your team then knows exactly what to make for each order.
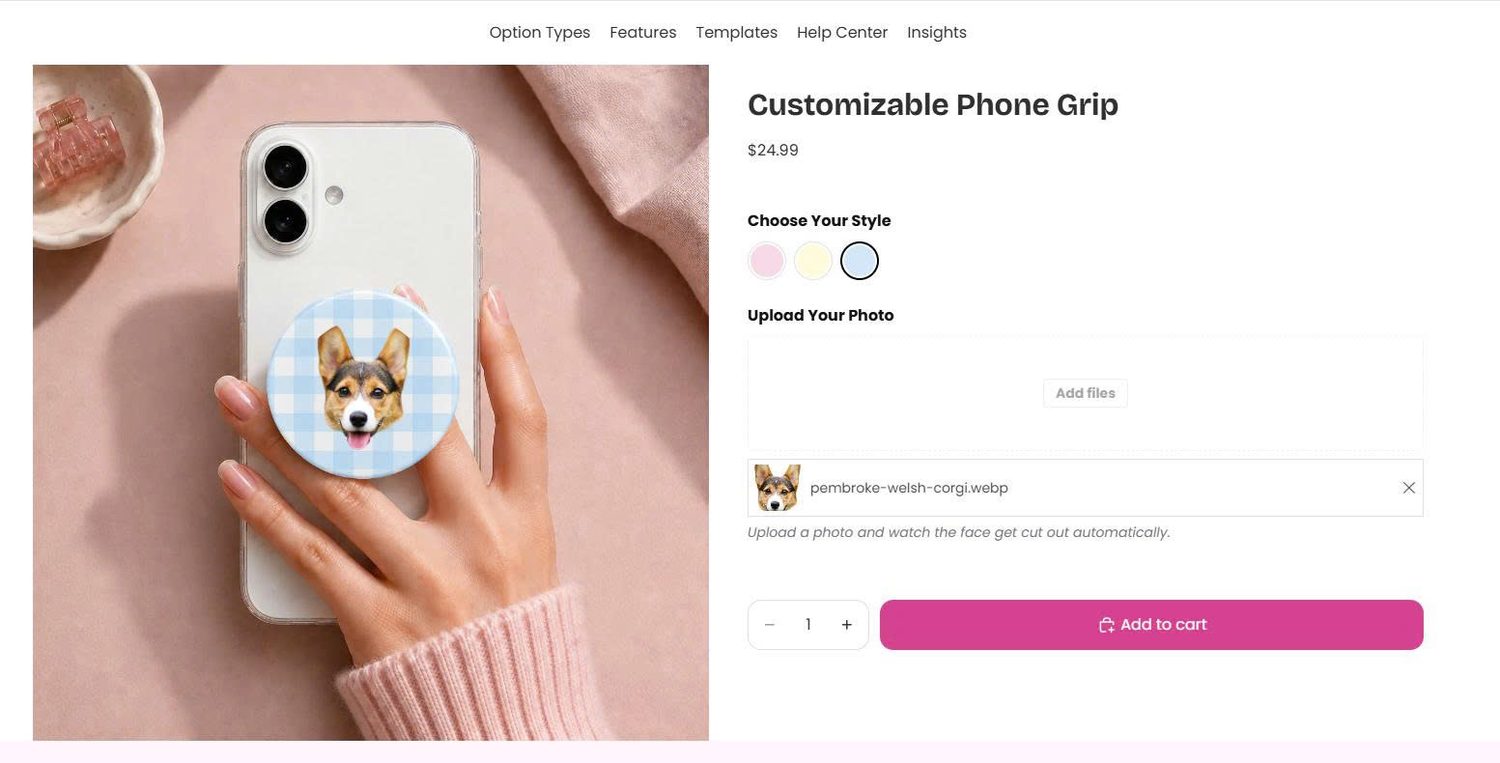
Variants are fixed versions of a product, while a customizer collects input that changes with every order. Each variant, such as “Small / Blue,” is its own item with its own price, SKU, and stock count.
Shopify sets two hard limits on variants. According to the Shopify Help Center, you can create up to 2,048 variants for a product, and each product can have up to 3 options. The variant cap rose from 100 to 2,048 in October 2025, as announced in the Shopify Changelog, but the 3-option cap did not change.
Here is a simple example. A necklace in 3 metals and 2 chain lengths fits neatly into 6 variants. The name stamped on the pendant does not fit, because you cannot create a variant for every possible name.
For anything beyond those limits, Shopify’s own Help Center points merchants to 2 options: a third-party app, or theme code that uses line item properties. Methods 2 and 3 below cover both.
Product customizers come in 4 types, and the right type depends on what your shopper needs to do.
| Type | What the shopper does | Best for | Example app |
|---|---|---|---|
| Options form | Types text, picks from dropdowns or checkboxes, uploads a file | Engraving, gift messages, made-to-order goods | Globo Product Options |
| Live-preview personalizer | Sees their text, font, or photo drawn on the product image | Jewelry, monograms, photo gifts | Zepto Product Personalizer |
| Print-on-demand design tool | Designs on the product, and the app creates a print-ready file | Apparel, mugs, wall art sold through print partners | Teeinblue Product Personalizer |
| Multi-component configurator | Builds one product from several parts | Sporting goods, furniture, complex builds | Kickflip |
Your store needs a product customizer when a product needs more than 3 options, free text, a file upload, or a price that changes with the shopper’s choices. These 5 signs make the need clear:
Demand for personalization is real, but it is narrower than many guides suggest. In Deloitte’s 2015 UK consumer survey, 36% of consumers said they were interested in personalised products or services. Only 1 in 6 had ever bought one.
The same survey found that 71% of the interested group would pay a premium. That gap between interest and purchase tells me the setup matters: shoppers who want personalization still need a clear and simple way to order it.
You do not need a customizer if every choice fits into size, color, and one more option. Native Shopify variants handle that for free.
There are 3 main ways to add a product customizer to Shopify: native variants for fixed choices, line item properties for a free custom text field, and a product customizer app for upcharges, uploads, and previews.
| Method 1: Variants | Method 2: Line item properties | Method 3: App | |
|---|---|---|---|
| Cost | Free | Free | Free plans available; paid plans from $8.90/month |
| Skill needed | None | Copy and paste one code block | None |
| Input types | Fixed choices only | Text field | Text, file upload, swatches, dates, and more |
| Charge extra | Yes, through variant prices | No | Yes |
| Conditional logic | No | No | Yes, on most apps |
| Live preview | No | No | On some apps and plans |
| Best for | Size, color, material | 1–2 simple text fields | Most personalized products |
Use Shopify variants when every choice comes from a short, fixed list and you want to track stock for each combination. Follow these 5 steps from the Shopify Help Center:
Each new value multiplies your variant count. Three options with 10 values each create 1,000 variants, which still fits under the 2,048 cap.
Check your theme before you go above 100 variants. The Help Center notes that some third-party themes, apps, and sales channels might not support more than 100 variants.
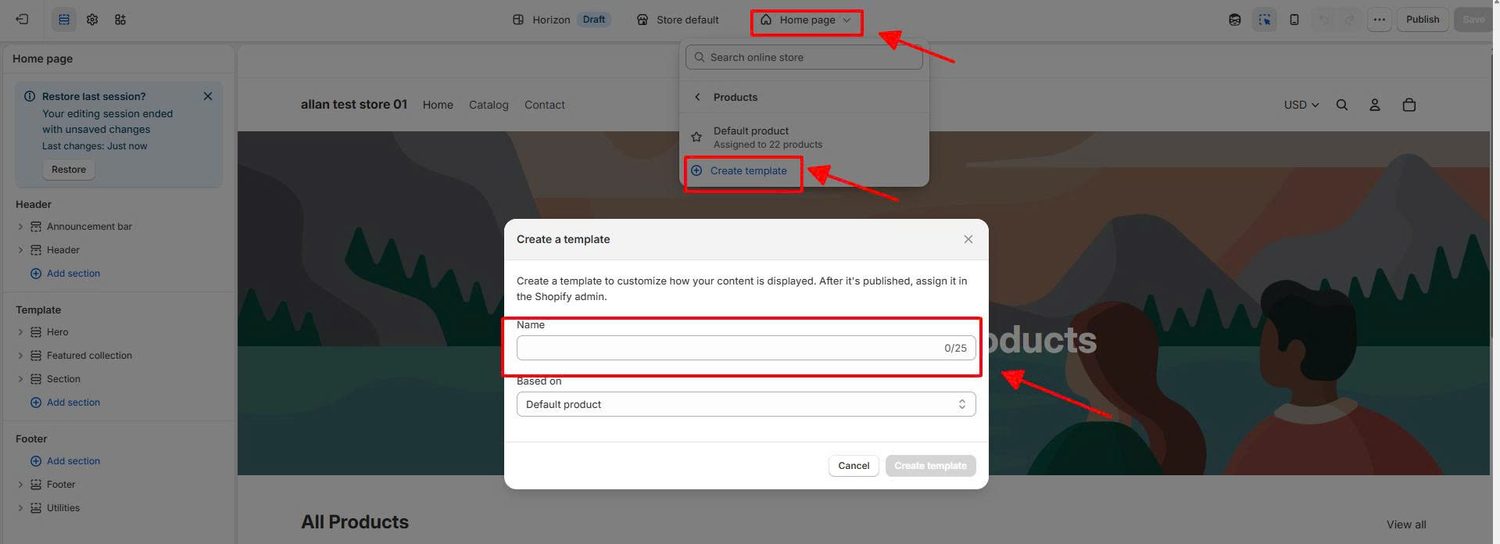
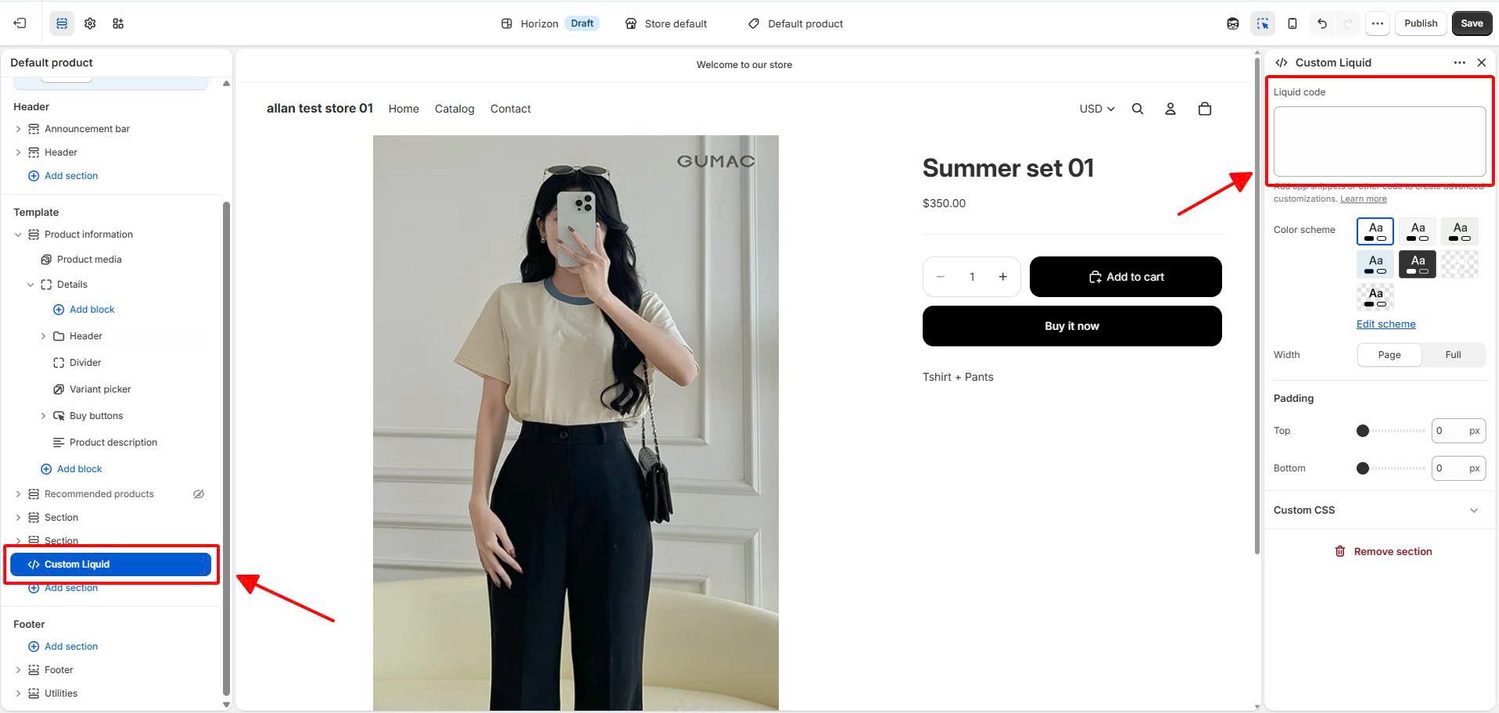
Method 2 adds a free text field to selected product pages with one code block in the theme editor. Shopify saves the shopper’s text as a line item property, so it appears in the cart, at checkout, and on the order.
These steps are written for Dawn and other themes built on Dawn’s code. If you use a different theme, read the note after the steps.
<p class="product-form__input">

  <label for="engraving-{{ section.id }}">Engraving text (up to 20 characters)</label><br>

  <input

    type="text"

    id="engraving-{{ section.id }}"

    name="properties[Engraving]"

    maxlength="20"

    placeholder="Example: Anna"

    form="product-form-{{ section.id }}"

    style="width: 100%; padding: 10px;"

  >

</p>
Each part of the code has one job:
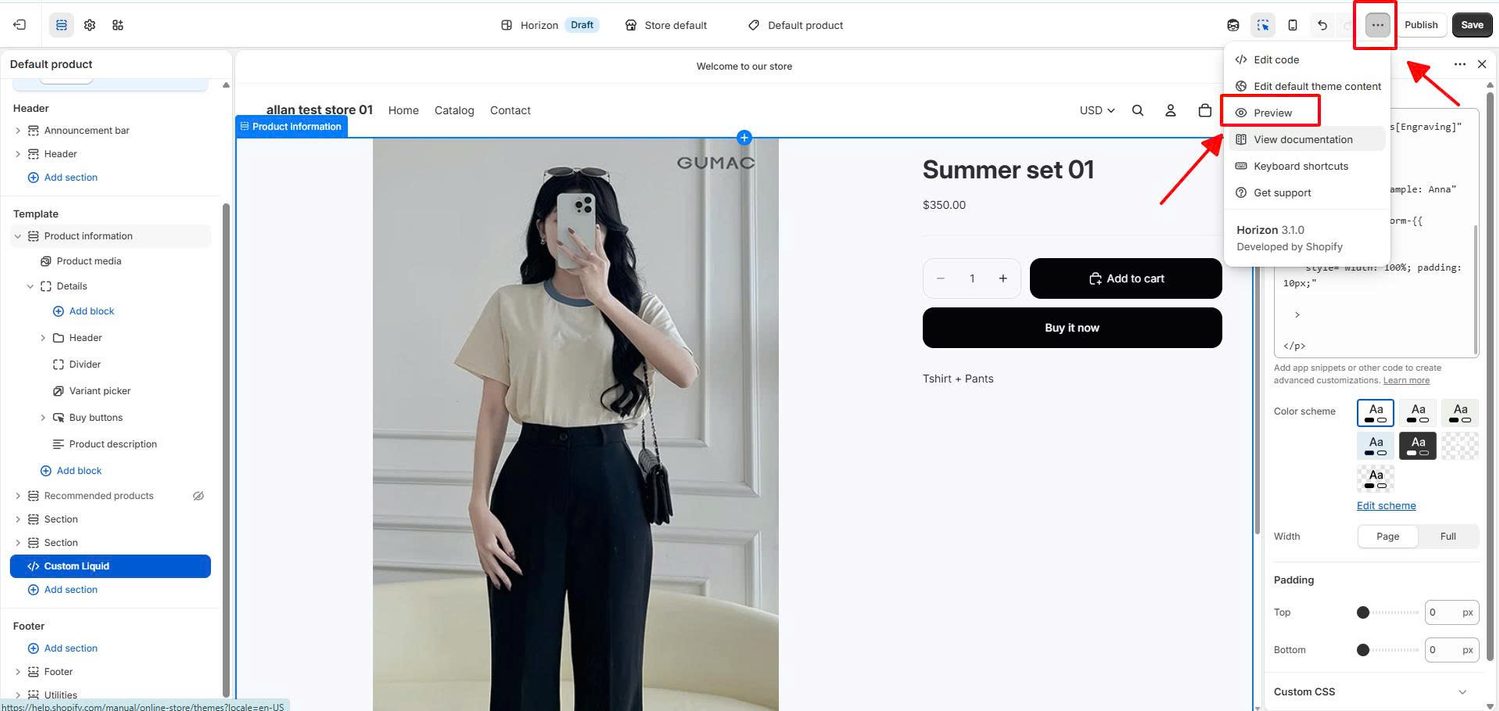
If your theme is not based on Dawn, its product form may use a different ID. Open a product page, right-click Add to cart, and choose Inspect. Find the id on the <form> tag that wraps the button, then replace product-form-{{ section.id }} in the code with that ID.
Method 2 has 5 limits you should know before you choose it:
Install a product customizer app when you need to charge extra, accept file uploads, show fields based on earlier choices, or show a live preview. These 3 apps cover the main types. I checked each live Shopify App Store listing on October 6, 2026.
| App | Rating (reviews) | Free plan | Paid plans from | Stand-out feature | Best for |
|---|---|---|---|---|---|
| Globo Product Options, Variant | 4.9 (5,121) | Yes | 9.90/month(39.90 on Shopify Plus) | Free plan shows options in orders, packing slips, and emails | Large catalogs with many option types |
| Easify Custom Product Options | 4.9 (3,108) | Yes | $9.99/month, same price on every Shopify plan | Per-character and formula pricing on the Pro plan | Shopify Plus stores, engraving priced per letter |
| PC ‑ Custom Product Options | 4.7 (1,181) | Yes | $8.90/month | Running since 2012; upcharges and conditional logic on the $18.90 plan | Simple text options on a small budget |
Pricing, limits, and plan features change often, so check each listing before you install. For full reviews, real feature limits, and the drawbacks of each tool, read our tested list of the best Shopify product customization apps. Print-on-demand sellers will find more detail in our comparison of Shopify personalized products apps for POD brands.
Install any new app on your duplicate theme first. This lets you check how the options look and behave before shoppers see them.
You can charge extra for custom options in 2 ways: make the paid choice a variant with a higher price, or use an app that adds a price add-on.
Your Shopify plan changes how an add-on fee can appear in the cart. Shopify’s developer docs state that only development stores or stores on a Shopify Plus plan can use apps that directly change a cart item’s price, title, or image. On other plans, an app may show the fee as a separate line in the cart instead, so check how your app displays it before launch.
Paid upgrades are one of the simplest ways to raise Shopify average order value without discounting. Price each upgrade to cover its real cost, such as extra production time or materials, plus a margin.
A product customizer is easy to use when shoppers understand every field at once, see only the fields they need, and know exactly what they will receive. Each improvement below removes a reason to leave the product page, which is the core of Shopify conversion rate optimization.
Grouping options into labeled steps helps more than cutting options. A 2010 meta-analysis of 50 experiments in the Journal of Consumer Research found the average “too much choice” effect was virtually zero. The same review highlights a study where more options lowered satisfaction only when the options were not grouped into categories.
For an engraved bracelet, use 3 labeled steps: “1. Choose your metal,” “2. Add your engraving,” “3. Add gift wrap.” Shoppers then handle one decision at a time.
Conditional logic shows a field only after an earlier choice makes it relevant. For example, an “Add engraving?” checkbox reveals the text box only when the shopper ticks it.
This keeps the page short for shoppers who want the standard product. Most customizer apps include conditional logic, though some keep it on paid plans.
A live preview is worth adding when the result’s look decides the purchase. Font choice on jewelry, photo placement on a mug, and logo position on a cap all need a preview.
A gift message does not need one, because the shopper already knows what the text says. Save the cost of a preview plan for products where appearance matters.
Every field needs a label that states the rule, such as “Name (up to 12 letters).” Add an example image of a finished product and state the production time near the Add to cart button.
Clear instructions also cut support emails about typos and wrong sizes. Our guide to writing Shopify product descriptions covers how to explain options in plain words.
Test every field on a phone before launch, because small screens expose cramped inputs and hidden buttons first. Text fields should span the full width of the screen.
Check your product page speed before and after installing an app. Apps with the Built for Shopify badge meet Shopify’s highest standards for performance, design, and integration, which makes the badge a useful filter. A customizer is one part of wider Shopify product page optimization, so review the whole page at the same time.
Customized products give you 3 natural ways to raise order value: paid upgrades, bulk orders, and matching add-ons.
If your shoppers already choose items one by one, such as a box of 6 candles in their chosen scents, a Shopify build-your-own bundle may suit them better than separate options.
Most product customizer problems come from 5 causes, and each one has a direct fix:
The right Shopify product customizer depends on what your shoppers need to do. Use variants for fixed choices, line item properties for 1–2 free text fields, and an app when you need upcharges, uploads, conditional logic, or a live preview.
Whichever method you choose, place one real test order before launch. Check the customer’s input on the order page, the packing slip, and the confirmation email.
Personalization works best alongside other tactics to increase sales on Shopify, such as clear product pages and offers that raise order value. Start with the simplest method that covers your products, then upgrade when your orders outgrow it.
Yes, you can customize products on Shopify without an app in 2 ways. Use variants for up to 3 fixed options and 2,048 variants, or add a text field with line item properties and one code block. Neither method can charge extra for free text or accept file uploads reliably.
A Shopify product can have up to 3 options and 2,048 variants. Shopify raised the variant limit from 100 in October 2025, but the 3-option limit stayed the same. To add more options, use a product customizer app or line item properties.
Yes, you can charge extra for personalization on Shopify through higher-priced variants or an app’s price add-ons. Apps that change a cart item’s price directly work only on Shopify Plus and development stores. On other plans, the fee may appear as a separate cart line.

Shoppers hesitate to buy a $1,200 sofa or a custom ring when they can’t see the exact version they’re...

The UK is the largest eCommerce market in Europe and the third-largest in the world. For international Shopify stores,...
A Shopify post purchase survey asks buyers 1–3 questions right after checkout, while the order is still fresh in...