Charlie Ngo is an eCommerce expert with 7 years of experience in the marketing field, specializing in SaaS and digital growth. A graduate in Marketing Communication, Charlie currently serves as the Marketing Manager of the BOGOS Shopify App, where he leads strategic initiatives to drive user acquisition, engagement, and brand positioning.
Most Shopify stores run returns out of an inbox. A customer emails, you dig up the order, you reply with instructions, you send a label, you follow up. Multiply that by every return in a busy week, and it eats real hours.
Shopify’s self-serve returns move that whole back-and-forth into a structured flow your customers run themselves. This guide covers the feature end to end: what it is, what it needs, how to set it up, and exactly how it looks for both your shoppers and your team. You will also see where the built-in tool stops and when a returns portal app earns its place.
I am Charlie Ngo, an eCommerce expert at BOGOS, and I spend my days helping Shopify merchants tighten the post-purchase experience.
TL;DR
Shopify self-serve returns let customers request a return or cancellation from their own account, and you approve it in your admin freely.
Shopify self-service only works with new customer accounts, a clear return policy, and return rules set up in advance.
Returns are a conversion issue, not just a cost. 46% of shoppers abandon a purchase when convenient returns are missing, and 81% read the policy before buying.
The native tool is basic. A returns portal app adds branding, automatic labels, and exchange-first flows that keep revenue in your store.
A refund is not the only option. Steer customers toward an exchange or store credit, then use a targeted discount or free gift to turn that saved sale into a bigger one.
1. What is Shopify Self-Service Returns?
Shopify self-serve returns let a customer start a return on their own, straight from their account, without emailing or messaging your team. The customer signs in, opens the order, and requests the return or cancellation. You then review that request in your admin and approve or decline it. It is a free feature built into Shopify, not a paid add-on.
The value is simple. You move return requests out of your inbox and into a structured flow, and the customer gets a clear path instead of waiting on a reply.
#1 What you need to turn it on
Before you enable self-serve returns in Shopify, make sure these three things are in place:
New customer accounts: The feature runs on Shopify’s new customer accounts. They do not work with classic customer accounts, which use the older email-and-password login. If your store still uses classic accounts, you need to switch to new customer accounts first.
A store-level switch: Once you turn it on, it applies across all your orders, including B2B customers. You cannot turn it on only for selected customers, products, or collections.
A request type. Shopify lets you choose what customers can submit from their account. You can allow returns only, cancellations only, or both. Choose based on how much control you want customers to have before your team reviews the request.
#2 What customers can and can’t request
Customers can request a return on items that have already been delivered. They can request a cancellation on items that have not shipped yet. Those are two different actions for two different stages of the order.
What they can’t request is shaped by your return rules. Items that fall outside your return window, and anything you mark as final sale, show up as ineligible, so the customer sees the limits before they submit.
2. Why Shopify Self-Service Returns Should Be A Priority
Returns now shape the sale long before anyone clicks buy. According to the National Retail Federation’s 2025 Retail Returns Landscape, 81% of shoppers read a store’s return policy before they purchase. If your process looks slow or unclear, you lose people at that moment, not at the return.
The cost of getting it wrong is direct. The same research found 46% of shoppers abandon a purchase when a store does not offer convenient return methods. That puts returns squarely inside conversion rate optimization, right next to the other leading causes of cart abandonment like surprise costs at checkout.
A weak returns experience also costs you the second sale. NRF also found that 71% of shoppers are less likely to buy from a retailer again after a poor return experience, up from 67% a year earlier.
So, a self-service flow that is clear, fast, and self-explanatory protects both the first order and the repeat one.
3. How To Set Up Self-Serve Returns In Shopify Admin
Setting this up is a three-part job. First, you create the return policy customers read. Then you set the rules that enforce it, and finally turn on the feature.
#1 Create your return policy
Your return rules are the enforcement layer. Your return policy is the plain-language version customers actually read, and 81% of them read it before buying. Write it first so the two match.
Shopify gives you a built-in way to create one:
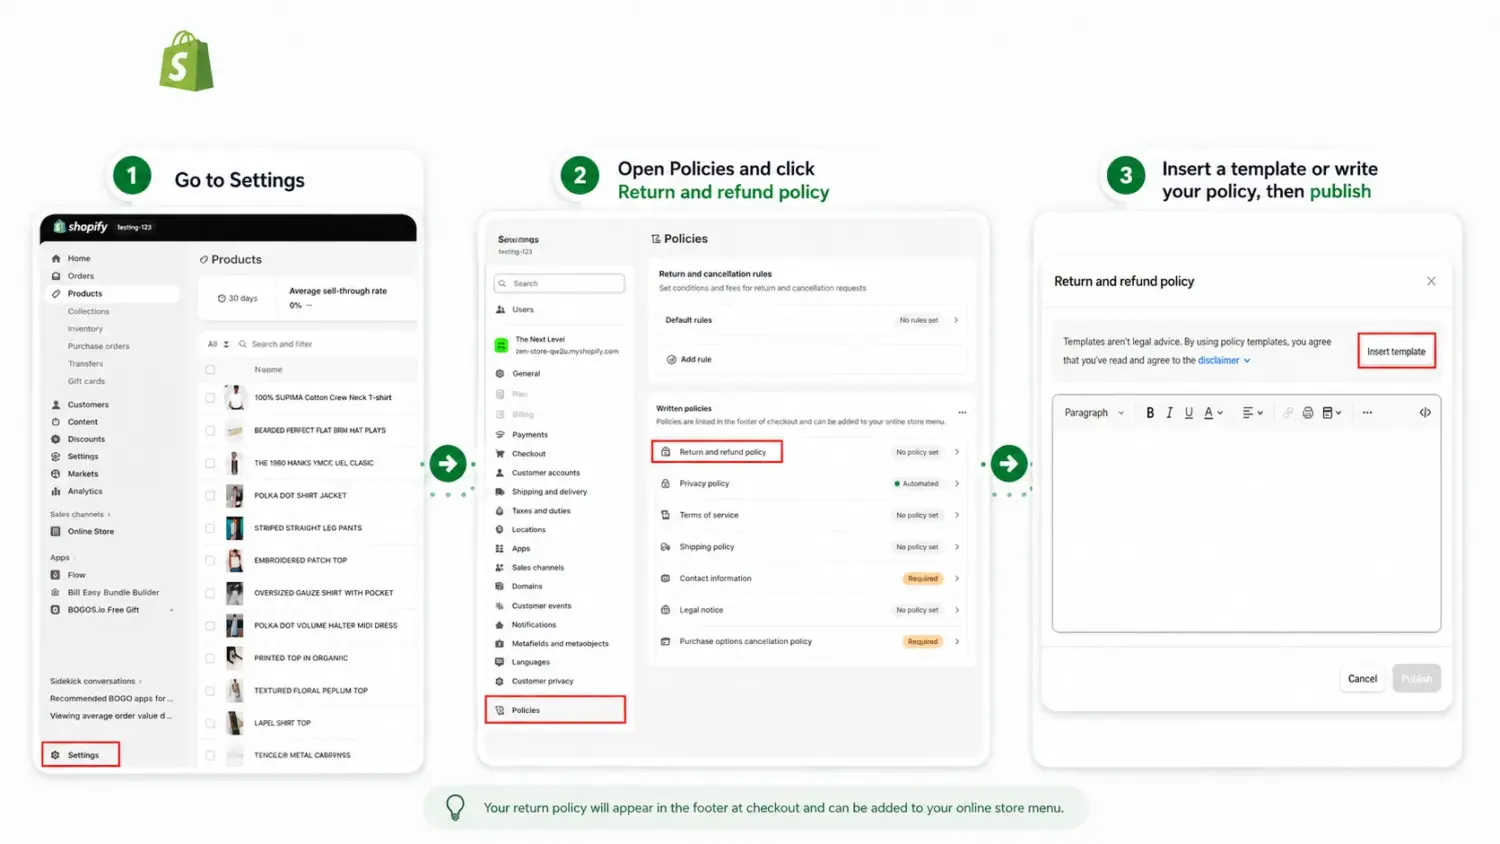
From your Shopify admin, go to Settings > Policies.
In the Return and refund policy section, click into the editor.
Either paste your own policy or click Create from template to start from Shopify’s sample, then edit it to match how you actually operate.
Click Save. The policy links automatically in your checkout and footer.
A template alone is thin, though. A policy that builds trust and cuts avoidable requests should spell out a few specific things:
What to cover
Definition
Return window
The exact number of days, and when the clock starts (delivery or order date)
Item condition
What state items must be in, such as unworn, unwashed, tags on, original packaging
Exclusions
Which items are final sale, such as underwear, personalized goods, or clearance
Fees
Whether you charge a restocking fee or return shipping, and how much
Refund method
Whether refunds go to the original payment, store credit, or an exchange
How to start
Where the customer goes to request a return (their account)
For the full walkthrough on writing one that converts, see our guide to building a clear Shopify return policy customers can actually read.
#2 Turn on self-serve returns
With the policy and rules in place, your next step is to activate the Shopify self-serve return from the Shopify Admin.
👉 Here is the step-by-step guide:
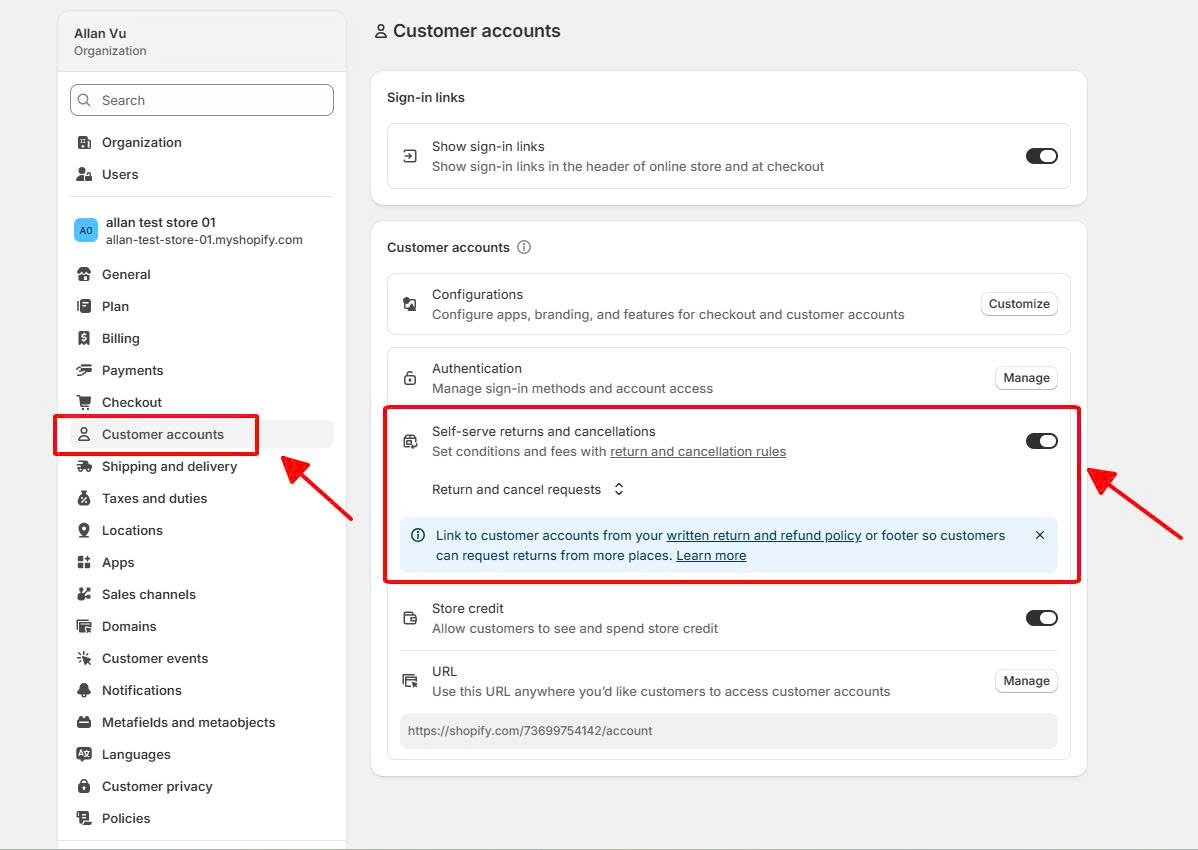
From your Shopify admin, go to Settings > Customer accounts and confirm you are on the new customer accounts. Migrate from classic first if you need to.
Navigate to the Self-serve returns and cancellations section and click the button to turn on this function.
Choose your preferred type between: Return request only, Cancel request only, or both.
Add a clear entry point so customers can find it, such as a link to their account from your store navigation or footer.
4. How Self-Serve Returns Work (Shoppers Side)
Once self-serve returns are enabled, customers can request a return on their own. They do not need to email your support team first.
Here is what the process looks like from the shopper’s side:
Step 1 – Sign in to their account
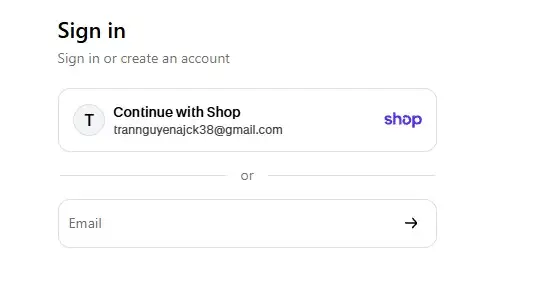
The customer opens their account from your store’s navigation menu or from the new customer accounts URL.
They enter the email address used for the order.
Shopify sends a six-digit verification code to their inbox.
The customer enters the code and signs in. No password is needed.
Passwordless sign-in gives customers a quick way to access their orders and start a return
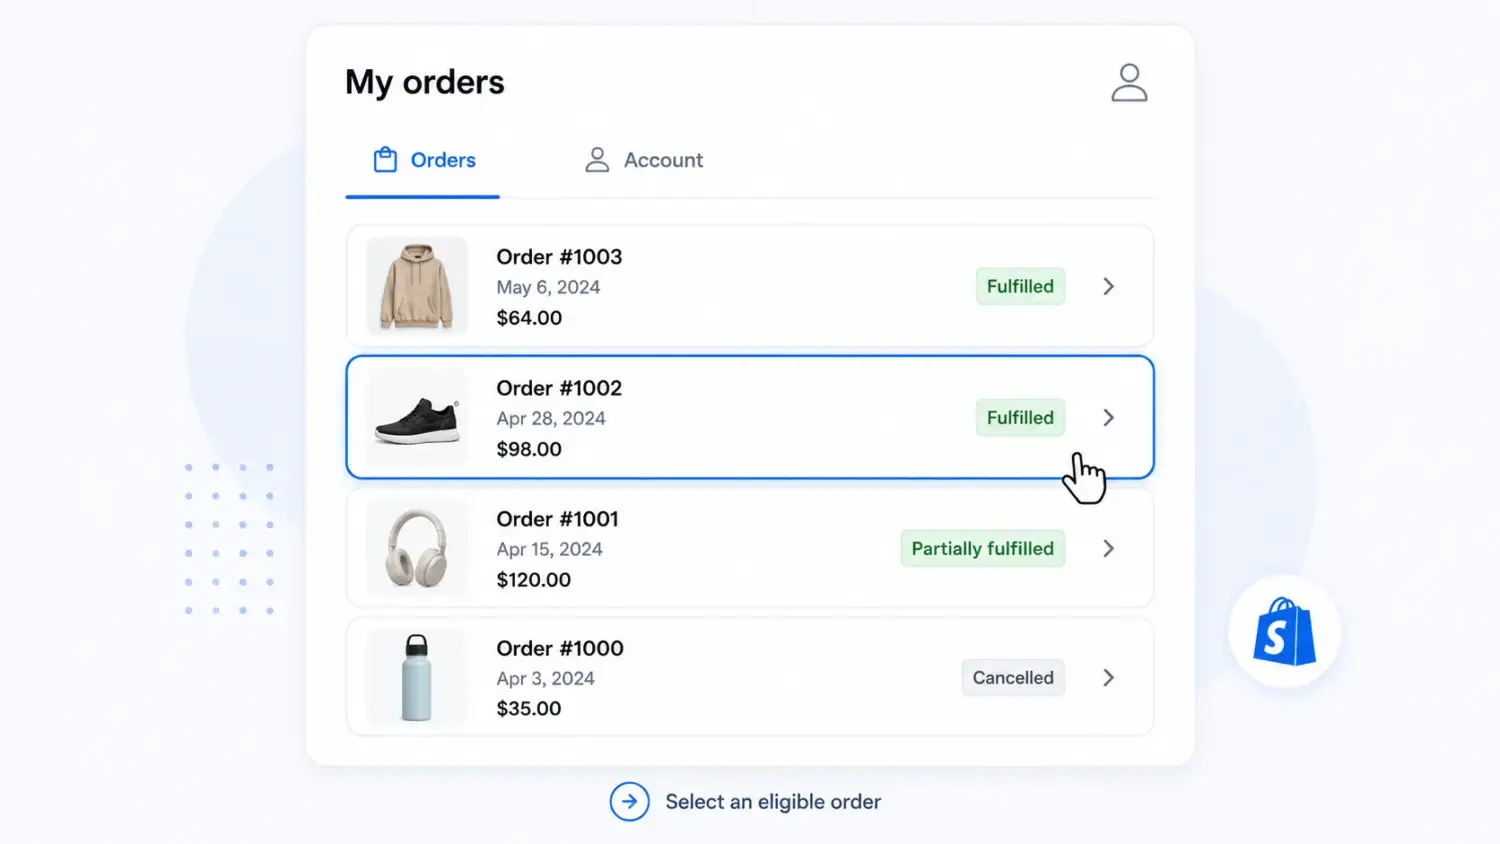
Step 2 – Open the order
After signing in, the customer sees all orders connected to that email address.
They select the order they want to return.
Return requests are available only for orders that are fulfilled or partially fulfilled.
Clear order statuses help shoppers identify which purchase is eligible for a return
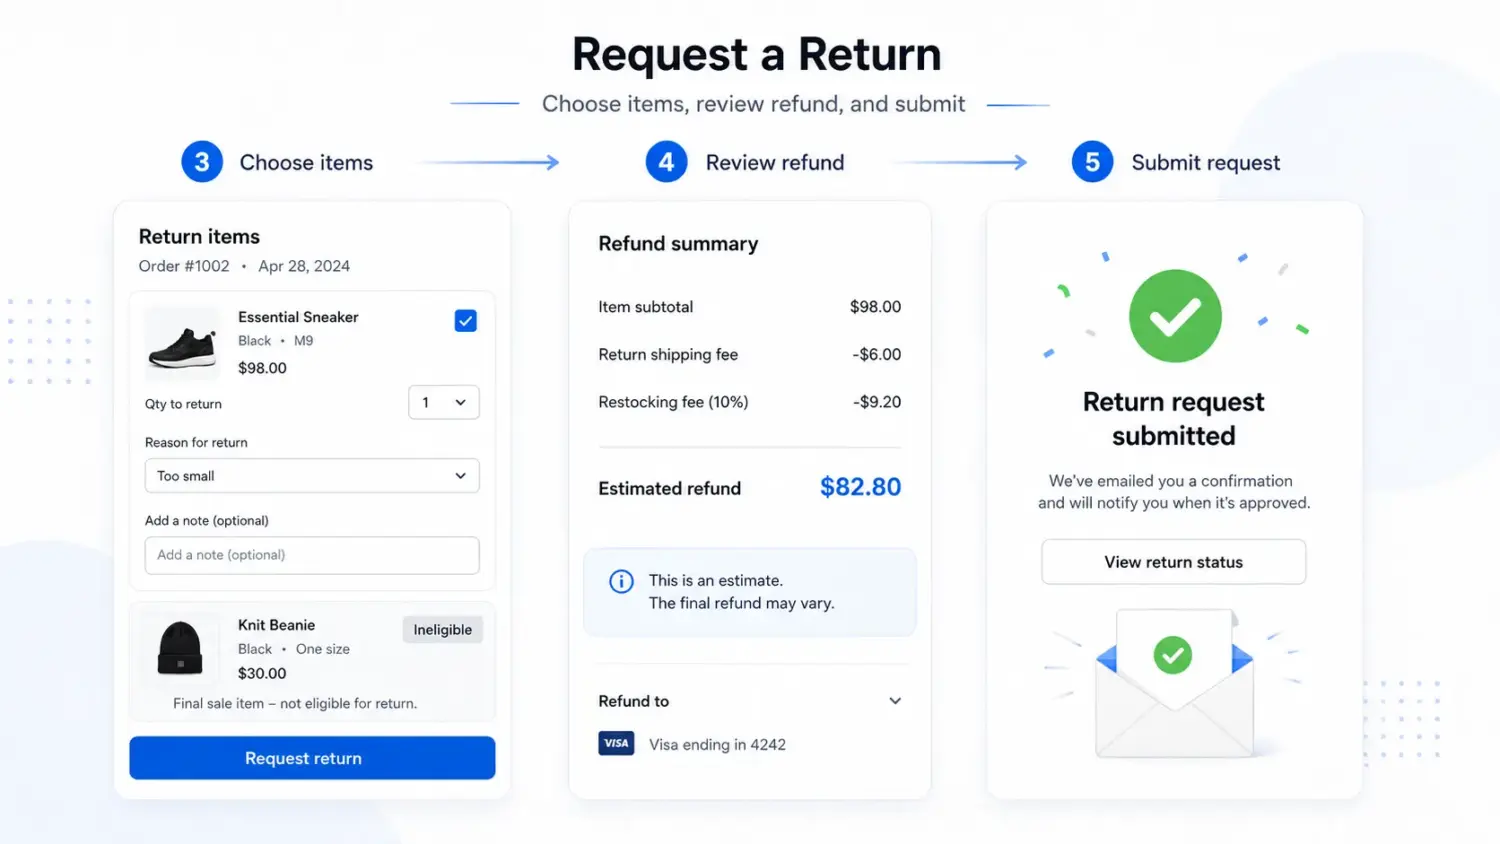
Step 3 – Choose the items and return reason
The customer clicks Request return.
They choose which item they want to return and set the return quantity. This is useful when they bought more than one of the same item.
Next, select a return reason from Shopify’s standard dropdown and add an optional note.
Items that are final sale or outside your return window will appear as ineligible.
Step 4 – Review the estimated refund
Before submitting the request, the customer sees an estimated refund.
This estimate follows your return rules, including any return shipping fee or restocking fee.
This helps reduce confusion before the request is sent.
Step 5 – Submit the return request
The customer submits the request for your review.
Both you and the customer receive a confirmation email that the request has been submitted.
Showing the estimated refund before submission helps prevent unexpected fees and confusion
Step 6 – Wait for approval and next steps
Once you approve the return, the customer receives return instructions by email.
If you provide a return shipping label, it is included in the email.
The customer then ships the item back based on your instructions.
5. How Self-Serve Returns Work (Merchants Side)
When a customer submits a request, the work moves to your admin. You stay in control: nothing is approved automatically, so every request waits for your decision.
Here is what the process looks like from the merchant’s side:
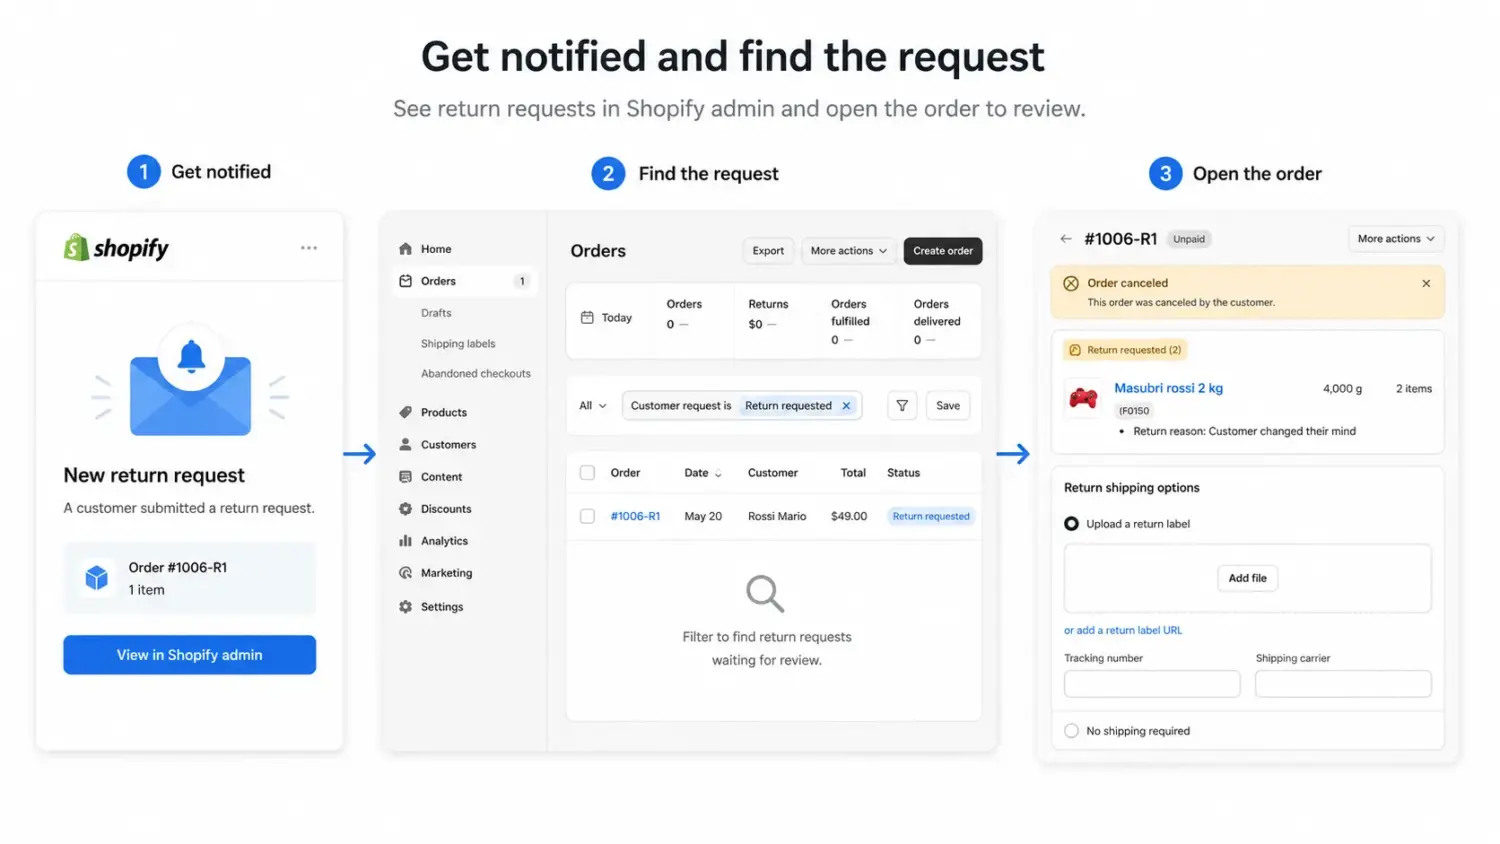
Step 1 – Get notified and find the request
You receive a confirmation email the moment a customer submits a request.
In your admin, go to Orders and use the Customer request filter to find requests waiting on a decision.
A return shows as a Return requested card on the order. A cancellation shows as a banner at the top of the order.
Showing the estimated refund before submission helps prevent unexpected fees and confusion
Step 2 – Review the request
Open the order and click Review request.
Check the items, the quantity, and the reason the customer gave.
Confirm the request fits your policy before you act on it.
Step 3 – Adjust fees if needed
In the summary, you can edit the restocking fee or the return shipping fee for this specific return.
The restocking fee can be set per return or per item. The return shipping fee is set per return.
Any change updates the refund the customer will receive.
Step 4 – Add an exchange (optional)
Instead of a straight refund, you can add exchange items to the return.
You can apply a discount to an exchange item if you want to.
An exchange keeps the revenue in your store rather than sending it back.
Step 5 – Choose the return shipping method
Create a return label in Shopify. Available only when your location and the customer are both in the United States.
Upload your own label. Add a PDF, PNG, or JPEG, or paste a label URL, plus a tracking number and carrier.
No shipping required. Create the return without any shipping details.
Step 6 – Approve or decline
To approve, confirm the return. The customer gets a confirmation email, with the label attached if you created one. If shipping is required, upload the return label and enter the courier’s tracking number.
To decline, pick a reason from the dropdown. This reason is for your records; the customer does not see it. Then leave a separate message for the customer explaining that the return falls outside your policy.
Step 7 – Inspect, refund, and restock
When the item arrives, inspect it before issuing a money-back refund.
Issue the refund to the original payment method, store credit, or both.
Restock the item if it is fit to sell again.
6. Recover Return Revenue With Discounts And Free Gifts
A return does not always have to end in a refund. Exchanges and store credit help you keep the revenue while giving customers more choice. In fact, 76% of shoppers are more likely to choose a return option that offers an instant refund or exchange.
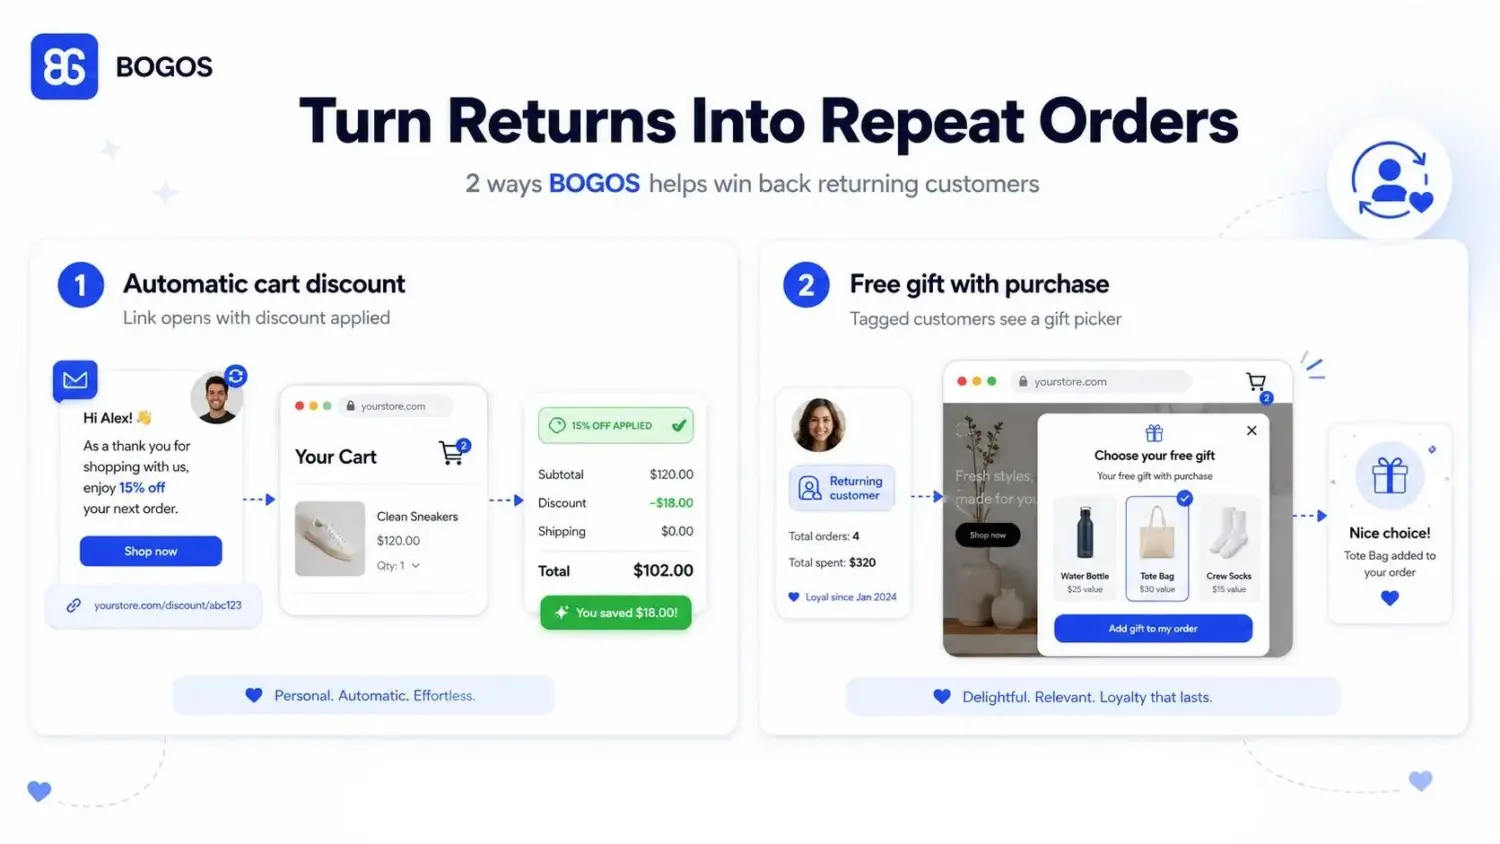
You can also use the next purchase to build stronger customer loyalty and grow sales. The BOGOS: Free Gift Bundle Upsell app gives you two ways to do this for your returning customers:
Automatic cart discount: Set up a cart discount tied to a specific link, then email that link to your returning customers. When they land on your store through the link and qualify, the discount applies to their cart automatically. There is no code to hunt for and paste.
Free gift with the order: Group your returning customers with a customer tag. Then, in the BOGOS app, create a surprise gift-with-purchase offer for that group. Whenever a returning shopper meets the offer condition, a pop-up gift slider appears and lets them choose the gift they want.
Done well, this does two things. It softens the moment for a customer who was unhappy enough to return something, and it gives them a reason to keep shopping with you naturally.
You can easily turn returns into bigger order value with targeted promotions with the BOGOS app
7. Limitations Of Shopify’s Built-In Self-Serve Returns
Shopify’s built-in self-serve returns are a solid starting point. They let customers request a return from their account, and they help merchants move away from messy email-based return requests.
But it is not a full returns platform. Once your return volume grows, you start to feel the gaps. Here are the limits that matter most.
#1 No customer-initiated exchanges
Customers can request a return, but they cannot request an exchange by themselves. They cannot pick a different size, color, or product from the return flow.
You can still add exchange items when you approve the return, but this happens manually from your side. That means the customer’s first action is still “I want to return this,” not “I want to exchange this.” For stores that want to increase sales revenue, this is a missed opportunity because exchanges help keep the sale inside your business.
#2 Limited branding
The return request pages use your checkout branding settings. That keeps the experience consistent enough, but it does not give you a fully branded returns portal.
Some checkout branding options also do not apply to these pages, such as logo position, logo alignment, and logo max width. So the experience works, but it can feel more generic than the rest of your store.
#3 Every request needs review
Self-serve does not mean fully automated. When a customer submits a return or cancellation request, you still review it in Shopify and decide whether to approve or decline it.
For a few returns a week, this is manageable. For a few returns a day, it becomes a real-time cost. The slower the approval, the longer customers wait for instructions, labels, or next steps.
#4 Shopify-generated return labels are US-to-US only
Shopify can generate a return label only when your primary location and the customer’s shipping address are both in the United States.
If your store is outside the US, or if you set up international shipping, you need another way to handle return labels. You can upload your own label or add a label URL, but the built-in label generation will not cover every market.
#5 Less granular return reasons
Shopify return reasons are based on the product category. For example, apparel products may show reasons like “Too big” or “Too small,” while other categories show different reason options.
This is useful for broad reporting, but it may not give you enough detail to understand the real problem. A reason like “not as expected” tells you something is wrong, but not whether the issue came from product photos, product copy, sizing, quality, color, or customer expectations.
#6 Basic return analytics
Shopify lets you view return reasons in analytics so you can spot broad trends. That is helpful, but the insight is still limited by the return reasons available in the system.
If you want deeper reporting by product, variant, size, customer segment, return outcome, exchange rate, or revenue retained, you will likely need a dedicated returns app.
#7 Requires customer accounts
Customers need access to customer accounts before they can submit return or cancellation requests. If your store still depends on the older customer account setup, you need to make sure customers can access the newer account experience or add the customer accounts URL to your store.
This is not a huge blocker, but it is one more setup step before the feature works smoothly.
When these limits start to cost you
A useful rule of thumb is volume and reach. If you handle a handful of returns a week and ship only within the US, the native feature is enough. Once you cross a few returns a day, ship internationally, or want exchange-first flows and a branded portal, the manual work and missing features start to cost more than an app would.
That is where a dedicated returns portal app earns its place. Rather than repeat a full breakdown here, I have compared the three best Shopify returns apps in a separate guide, including where each one fits by store size, shipping reach, and budget. Start there when the native feature stops keeping up.
Fees make the same point. Native return rules let you charge a restocking or return shipping fee, but they are a blunt instrument. NRF’s 2025 data found that among retailers who started charging for returns, 47% saw complaints rise and 34% saw average order value fall. A returns app gives you finer control, like waiving fees for exchanges while keeping them for refunds, so you protect margin without punishing the customers you most want back.
Conclusion
Shopify self-serve returns reduce support work by letting customers submit requests on their own. Once you set your return policy, rules, and eligibility, requests appear in your Shopify admin for approval. For stores with a manageable return volume and mainly US-based shipping, the built-in feature may be enough.
However, returns are more than an operational task. They can influence whether customers buy from you and whether they return.
So start now. Write a clear policy, set your rules, and turn on self-serve returns this week. Watch your volume and your shipping reach. When manual work or US-only labels slow you down, add a returns app. And always lead with an exchange or store credit over a refund. That way a return becomes your next sale, not a lost one.
FAQs
#1 Are Shopify self-serve returns free?
Yes, Shopify self-serve returns are completely free. You only pay if you add a third-party returns app for features the native tool lacks, like a branded portal, automatic international labels, or customer-initiated exchanges.
#2 How to automate returns on Shopify?
Automate Shopify returns by enabling native self-serve returns to let customers generate requests independently, or use a third-party app for fully automated label generation, instant refunds, and logistics.
#3 Can I automate return labels?
You can automate return labels only partly with the native feature. Shopify generates a prepaid return label automatically, but only when your store and the customer are both in the United States. For automatic labels on international returns, you need a dedicated returns app.