
Charlie Ngo
•
Last updated: 21 July, 2026
Shopify One Click Checkout: What It Is + How to Add It
I wrote this guide because “one click checkout Shopify” is one of the most misunderstood searches merchants make, and...

How to Set Up Custom Shipping Rates on Shopify?
Digital Marketing Specialist
Summarize this post with AI
Shipping is one of those things that looks simple until it isn’t.
You set a flat rate, launch your store, and everything seems fine. Then customers start dropping off at the checkout. Margins on your heavier products get squeezed. Someone in Alaska is paying the same rate as someone two cities away, and honestly, that doesn’t make sense for anyone.
Sound familiar?
Shopify custom shipping rates put you in control of exactly what customers pay based on conditions you actually care about. Cart total, product weight, destination, product type, and more. When it’s dialed in, shipping stops being a background headache and starts helping you sell more instead of quietly killing conversions.
This guide covers everything: what custom shipping rates are, how to set them up step by step, the types of rules that tend to work best, and the mistakes worth avoiding.
Custom shipping rates are charges you configure around specific conditions, not just a single flat fee slapped on every order.
Instead of charging every customer $7.99 regardless of what they ordered or where they live, you can build rules like:
This flexibility matters because your actual shipping costs vary. A customer ordering one lightweight item costs you almost nothing to ship. A customer ordering three heavy products to a remote location? Significantly more.
If you’re charging the same rate for both, you’re either overcharging one person or subsidizing the other.
Out of the box, Shopify gives you three rate types inside your shipping profiles:
| Rate Type | What It Does |
|---|---|
| Flat Rate | Charges a fixed amount regardless of order size or weight |
| Price-Based Rate | Charges based on the order subtotal (e.g., free over $50) |
| Weight-Based Rate | Charges based on total order weight |
These cover a lot of common ground. But they have limits. You can’t charge differently based on which specific products are in the cart, build a tiered discount structure, or create location-specific rules beyond basic country/region zones not without additional tools, anyway.
There are two main paths: Shopify’s native settings and third-party apps. Which one you need depends on how complex your setup is.
Shopify’s built-in shipping works well for straightforward stores. If your products have consistent weights, you ship to predictable regions, and your conditions are simple the native tools are probably enough.
Everything lives inside Settings > Shipping and Delivery, where you’ll configure:
Free, built-in, no apps required.
Third-party Shopify apps are a great option when the default shipping settings don’t offer enough flexibility. They let you create advanced rules like location-based rates, product-specific charges, or pricing based on cart value without needing complex coding. This makes them ideal for stores with custom delivery needs or regional pricing.
These apps are easy to integrate and manage, often providing simple dashboards to control your shipping logic.
A good example is ShipZip, which allows you to set precise shipping rates using postal codes. It’s a practical choice if you want more control and a smoother, more accurate shipping experience for your customers.
👉 Read more: Best Shopify Free Shipping App: A Detailed 2025 Comparison
Here’s the exact process inside your Shopify admin.
Step 1: Open Shipping Settings in Shopify
From your Shopify admin dashboard, navigate to Settings (located in the bottom-left corner).

Understand Shipping Profiles:
Before selecting or editing shipping settings, it’s important to understand how shipping profiles work in Shopify. Shipping profiles help you control how shipping rates are applied to different products in your store.
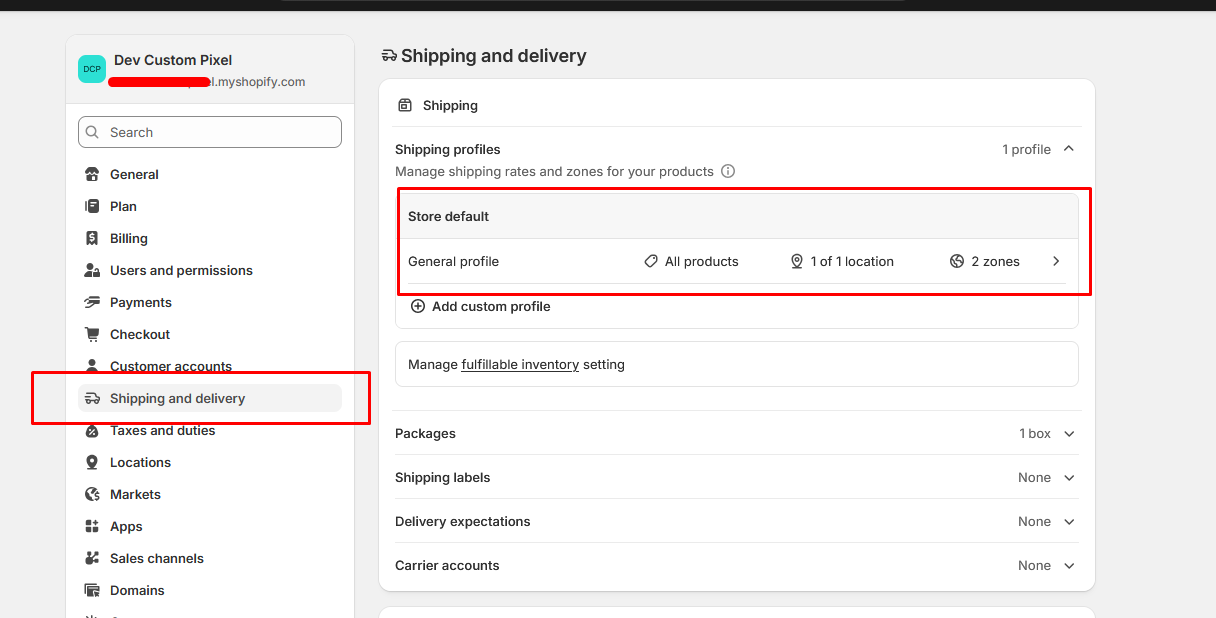
Step 2: Edit the General Shipping Profile
Go to Shipping and Delivery and click on the General shipping profile.
This is the default shipping profile in Shopify, and it applies to all your products unless you assign them to a custom profile.
Products: All products are included to the general profile and new products are added by default.
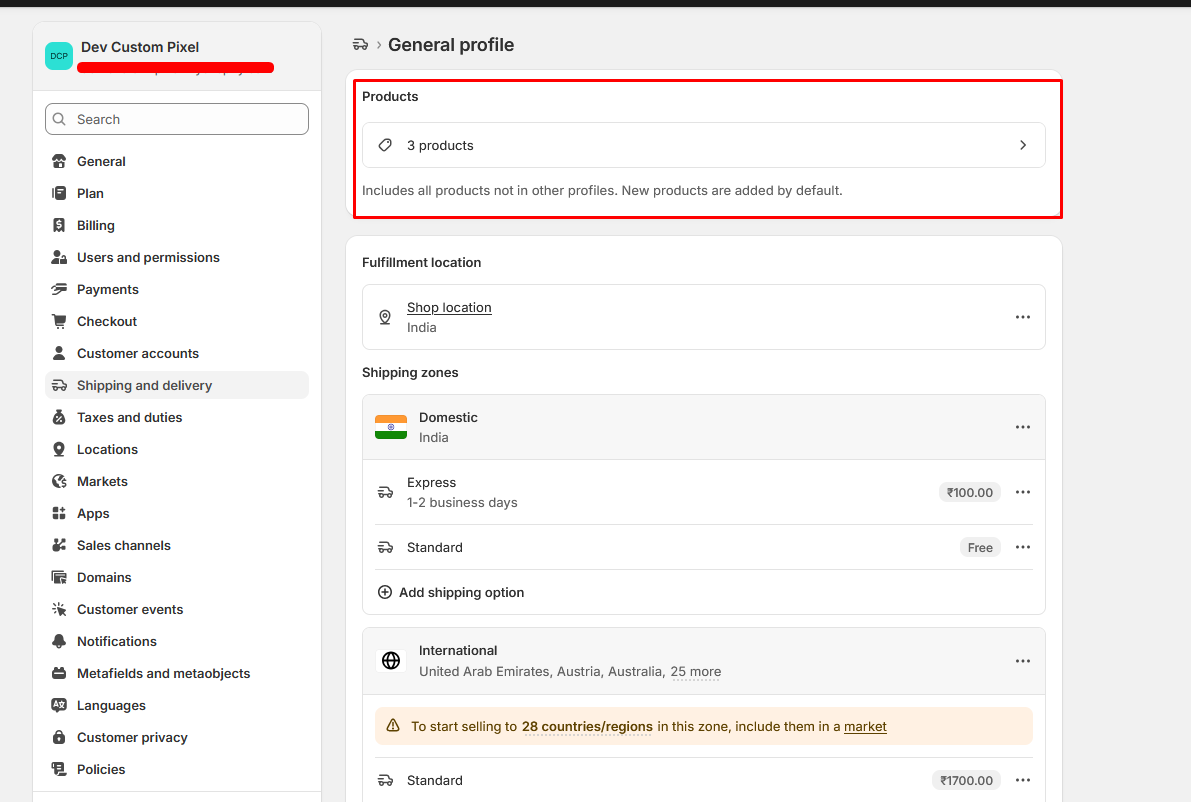
Step 3: Set Up Shipping Zones
Shipping zones define where you ship your products and allow you to apply different shipping rates based on location.
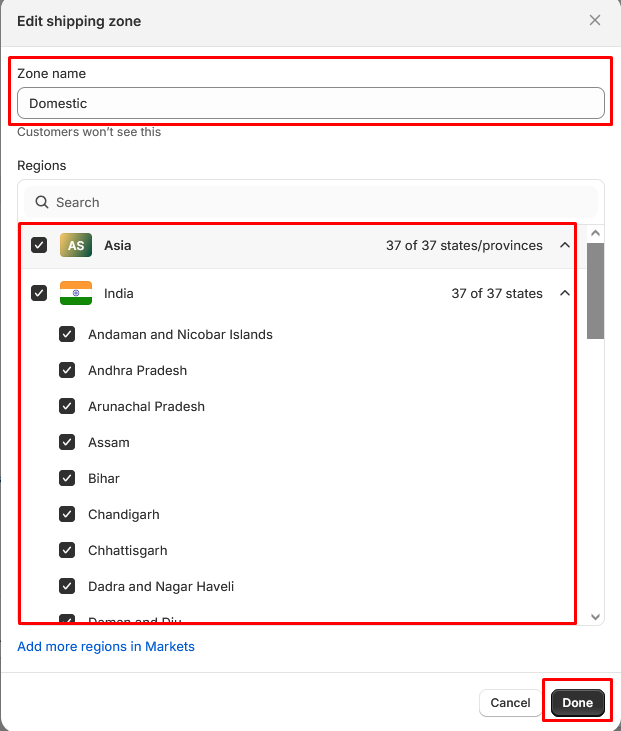
Domestic Shipping Zone: To update your domestic shipping settings, click on the three dots (⋯) next to the Domestic zone and select Edit zone.
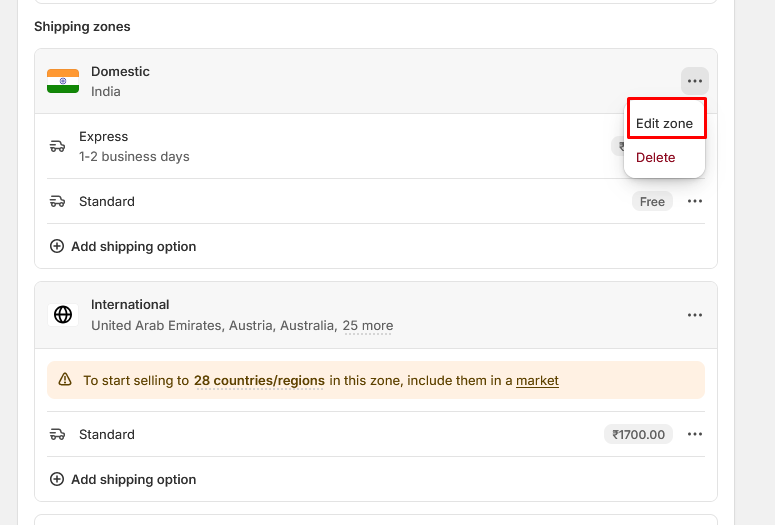
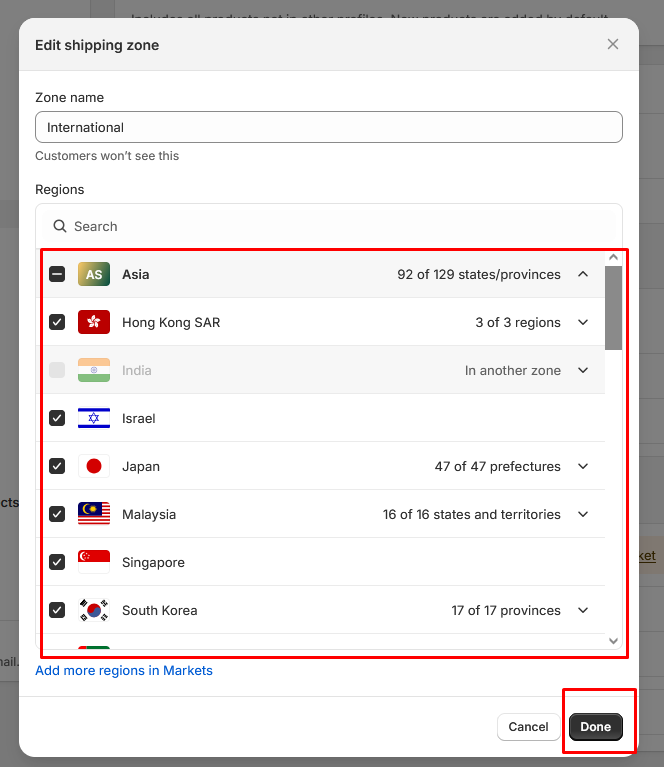
Select Zone Locations: After clicking Edit zone, a popup will appear where you can select the locations for this shipping zone. Choose the countries, states, or regions you want to include, then click Done to save your changes.
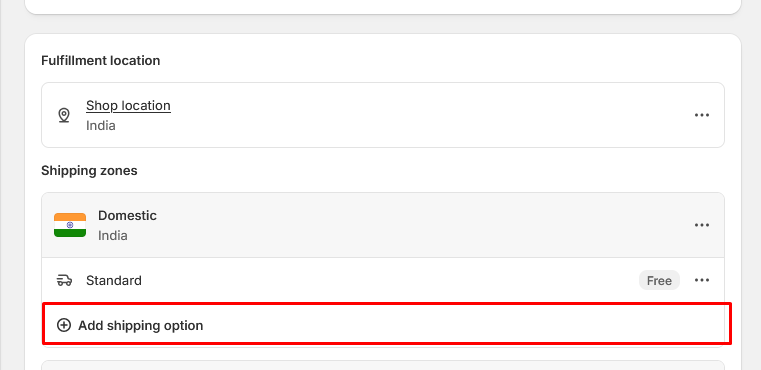
Step 4: Once your shipping zone is set up, you can start adding shipping rates.
Under the selected shipping zone (e.g., Domestic), click on “Add shipping option.” This will allow you to create a new shipping rate for that specific zone.
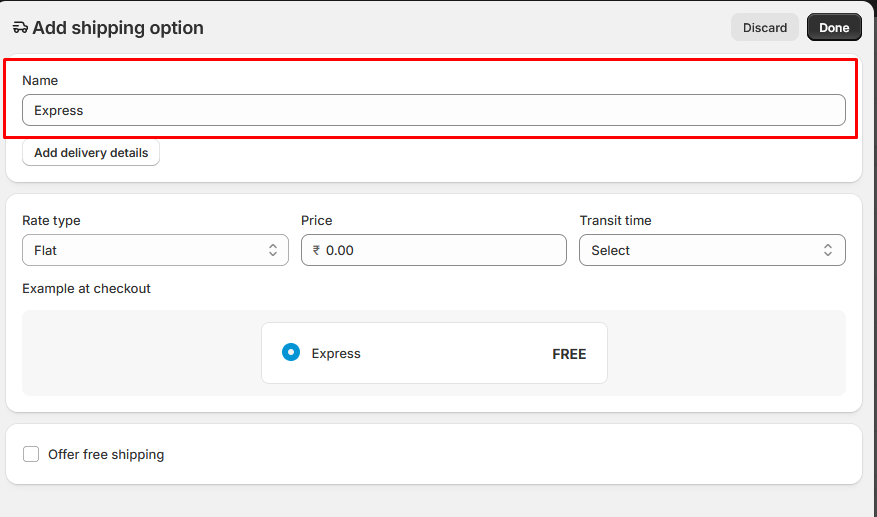
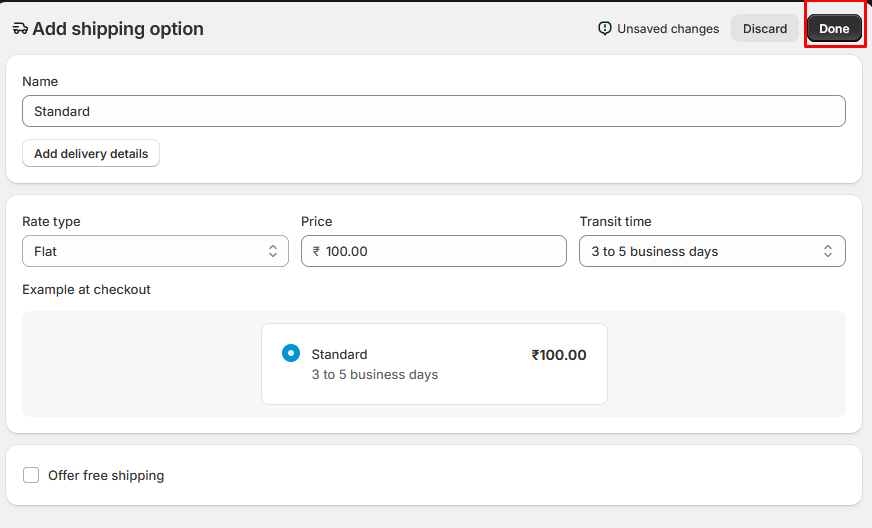
Step 5: Add shipping option name which is visible to all the customers.
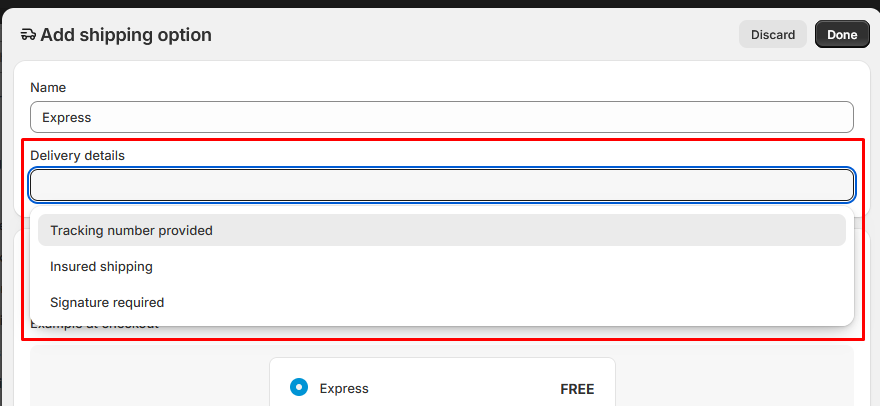
Step 6: Choose the delivery details(Optional)
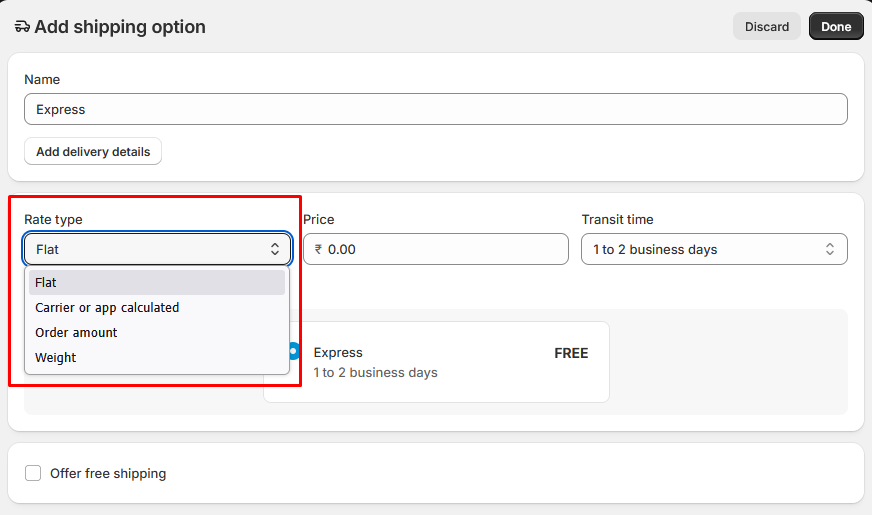
Step 7: Select Rate Type
Choose how you want to charge for shipping:
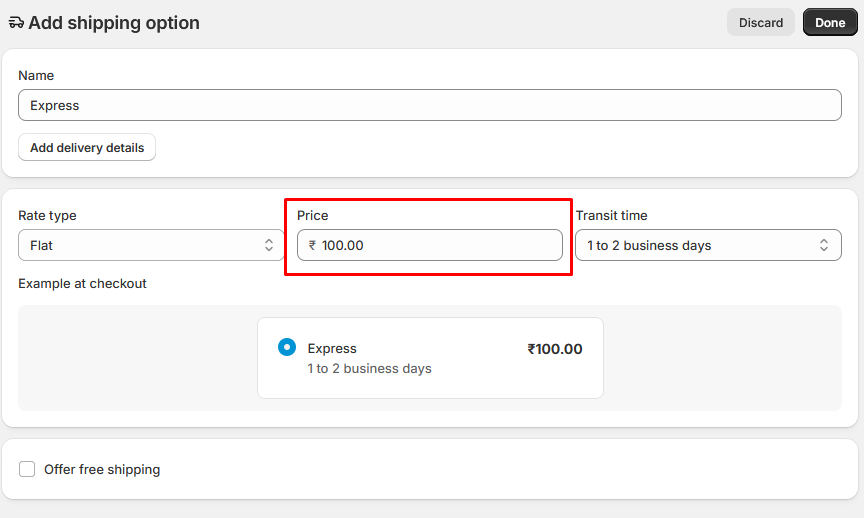
Step 8: Add the Shipping Price: Enter the price for this shipping option based on your pricing strategy.
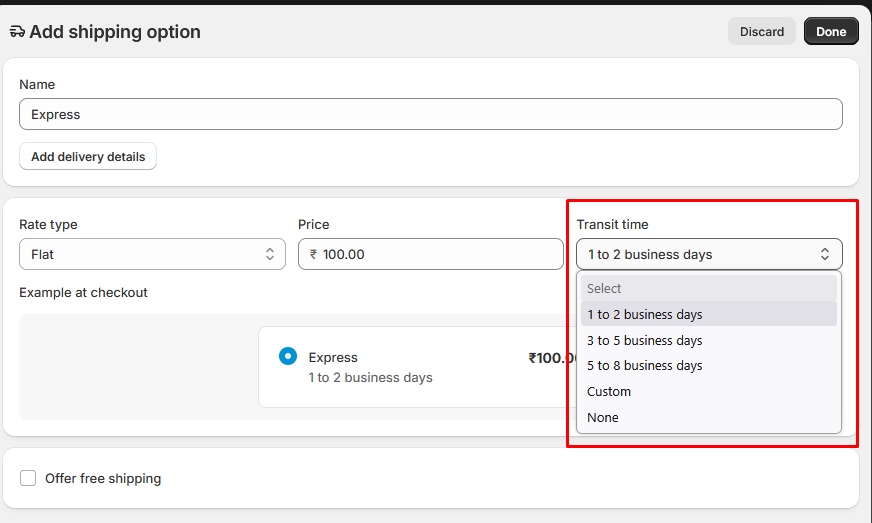
Step 9: Add the transit time: Enter the estimated delivery time for this shipping option.
Step 10: Offer Free Shipping (Optional): You can also offer free shipping to attract more customers and increase conversions.
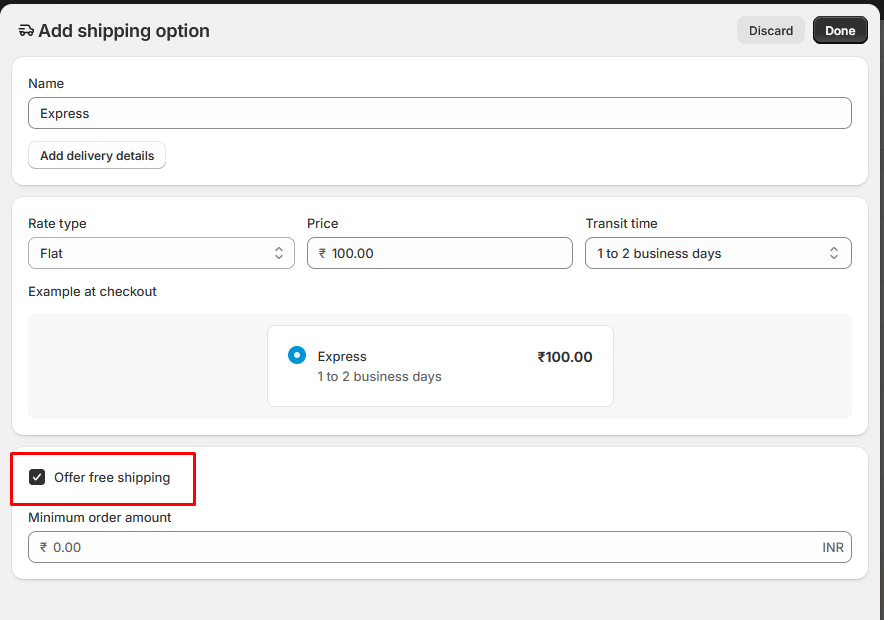
Step 11: Save Your Shipping Settings: Once you’ve configured the shipping rate, click Done to save your changes.
Step 12: Click Save
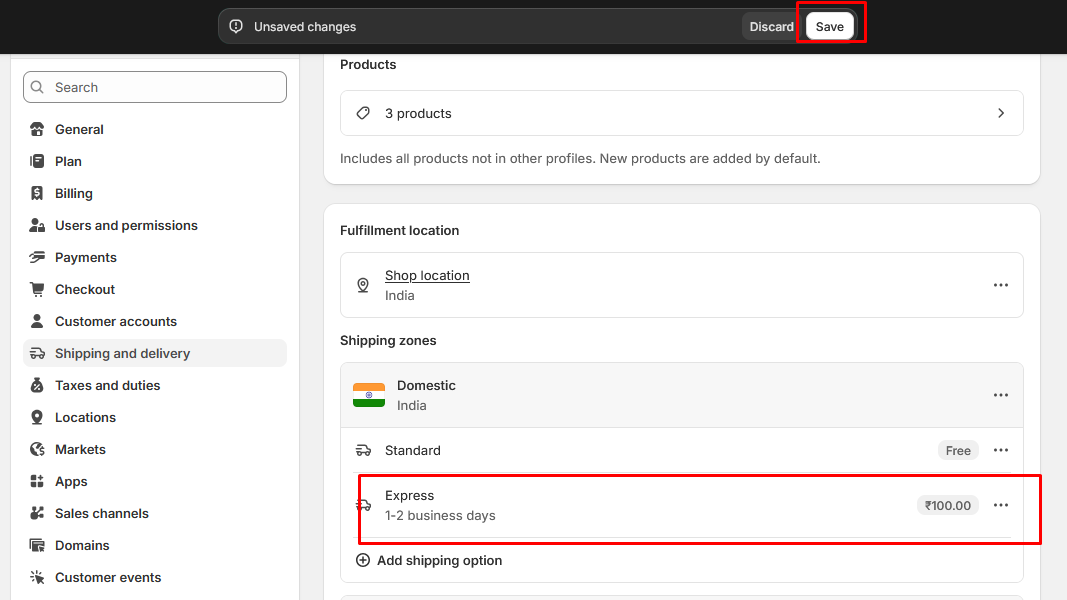
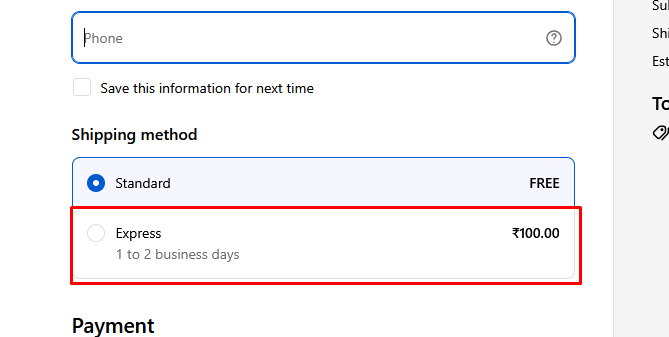
Step 13: Express shipping is available at checkout
Edit International Zones
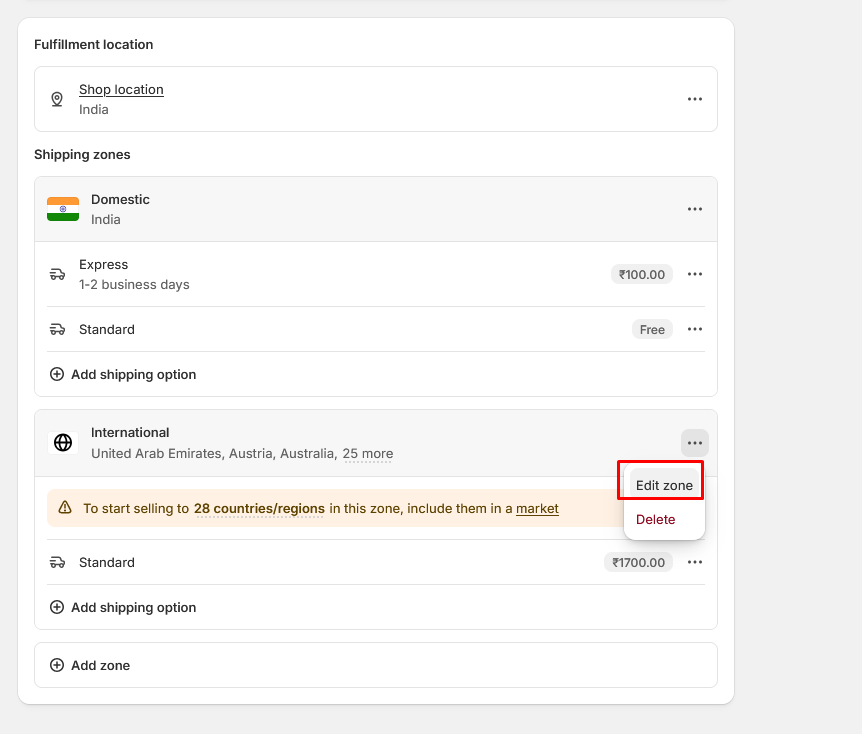
International Country:
Set Up Advanced Custom Shipping Rules with Shopify Apps
Shopify’s default shipping settings are great for basic setups like flat rates, price-based, or weight-based shipping. However, they come with limitations that can restrict growing or complex stores.
These limitations can make it difficult to accurately charge shipping or create a smooth checkout experience for customers.
What Shopify Shipping Apps Can Do
This is where advanced Shopify apps come in. They extend the default functionality and allow you to create highly flexible, rule-based shipping setups.
With apps like ShipZip, you can:
By using an app like ShipZip, you can go beyond basic shipping and build a setup that truly matches your business needs making your checkout more accurate, flexible, and customer-friendly.
Different businesses have different needs. Here are the setups that tend to work best — and when to use them.
Probably the most popular setup. You charge less (or nothing) as cart value increases.
Example:
Here’s the thing this directly incentivizes higher order values. Customers who are $10 away from free shipping will often add something just to get there. It’s one of the cleaner levers for lifting average order value (AOV).
Set these natively by adding multiple price-based rates within the same zone, each with different min/max order conditions.
Essential for stores that sell products with real weight variation. Furniture, pet food, industrial equipment if heavier orders cost you meaningfully more to ship, weight-based rates protect your margins.
Example:
Make sure every product has an accurate weight under its inventory settings. Incorrect weights lead to miscalculated rates, and that hits your bottom line directly.
Some products legitimately cost more to ship. Large, fragile, or hazardous items often need special handling. A flat rate across your entire catalog means you’re either eating those costs or overcharging on easy-to-ship items.
Shopify’s custom shipping profiles let you segment products. Assign specific items to a separate profile with its own rates standard products ship at regular rates, oversized or specialty items get their own pricing.
A home goods store might have one profile for kitchen accessories and a separate one for large rugs or furniture pieces with freight rates and a handling fee. Simple enough, but makes a real difference.
👉 Read more: How to Create Shopify Free Shipping For Specific Products?
Geography affects shipping cost more than most merchants realize. Shipping from Texas to California is a different price than shipping to Maine or Hawaii. It just is.
With Shopify’s zones, you can create separate rate structures for:
Set up multiple zones, apply different rates to each. Customers automatically see the rate that matches their delivery address.
Similar to cart-value-based shipping, but instead of binary free/not-free, you build a sliding scale.
Example:
This keeps customers aware of how close they are to the next tier — which nudges them to add more to their cart.
Name your rates clearly. “Standard Shipping (3–5 Business Days)” converts better than “Flat Rate.” Customers want to know when their order arrives, not just what it costs.
Don’t hide the free shipping threshold. Use your cart page or a sticky announcement bar to show customers exactly how much more they need to spend. Apps like Free Shipping Bar or ReConvert handle this well.
Test every scenario before going live. Add a 2 lb product to cart. Then a 10 lb product. Check international rates. Checkout as a customer in a different zone. Shipping errors discovered post-launch create real customer service problems.
Keep your product weights accurate. Sounds obvious — but it’s one of the most common causes of shipping miscalculations. Go through your product list and verify every weight, especially if products were imported via CSV.
Review your rates quarterly. Carrier rates change. Your product mix changes. Your AOV shifts. Rates that made sense 12 months ago might be leaving money on the table — or costing you customers today.
Getting your rates wrong isn’t just annoying. It has a measurable business impact.
Checkout is where bad shipping surprises do the most damage. Unexpected shipping costs are consistently the top reason shoppers abandon carts. A customer who adds $40 of products expecting a reasonable shipping cost and then sees $15 at checkout? You’ve lost that sale. Simple as that.
Transparent, predictable rates reduce abandonment. When customers know roughly what to expect before hitting checkout, the surprise is gone.
Set your free shipping threshold too low and you’re giving away margin unnecessarily. Too high and customers don’t bother reaching for it.
The sweet spot is usually 20–30% above your current AOV. If your average order is $55, set free shipping at $70 or $75. Customers will spend a bit more to get there — raising your AOV without feeling like they’re being pushed.
This one’s quieter but equally damaging. If your shipping rates don’t reflect actual carrier costs, you’re subsidizing shipping out of your product margin. On volume, that adds up fast.
A store doing 500 orders a month at an average shipping cost of $8.50 but charging customers only $6.00 is losing $1,250 every month. That’s $15,000 a year quietly walking out the door.
Reconciling your charged rates against actual carrier invoices regularly is worth the effort.
Setting up Shopify custom shipping rates isn’t a one-time task. It’s an ongoing part of running a profitable store.
Start with the basics: define your shipping zones, create conditions based on order value or weight, and make sure your rates actually reflect what you’re paying carriers. Then refine over time as you learn what your customers respond to.
The merchants who get shipping right aren’t always the ones offering the lowest rates. They’re the ones who’ve built a system that’s transparent, predictable, and aligned with their actual costs. Customers respect that. And your margins will thank you.
If you’re selling anything beyond a simple single-SKU store, take the time to figure out whether Shopify’s native tools are enough — or whether something like Intuitive Shipping will save you money and headaches down the road.
Get this right and shipping stops being a friction point. It becomes a feature.
Yes. Use Shopify’s custom shipping profiles to assign different products to different shipping rules. Create a new profile, name it, add the relevant products, and set up separate zones and rates within it. Especially useful for stores with products that vary significantly in size or weight.
Go to Settings > Shipping and Delivery, open your shipping profile, and add a new rate with a price condition. Set the minimum order price to your threshold (e.g., $75) and set the rate to $0. Name it “Free Shipping” so it’s clear at checkout.
Not always. Shopify’s built-in tools handle flat rates, price-based rates, and weight-based rates natively. You’ll need an app if you want more complex logic product-specific rates, stacked conditions, real-time carrier quotes, or advanced tiered structures.
It connects your store to real-time rates from carriers like UPS, FedEx, USPS, and Canada Post. Instead of a fixed rate you set manually, customers see live quotes at checkout based on package weight, dimensions, and destination. Available on Shopify, Advanced, and Plus plans, or as a standalone add-on.
A few common causes: the customer’s address doesn’t match any of your configured zones, the cart total or weight falls outside your rate conditions, or two rates are conflicting. Double-check your zone coverage and make sure your rate conditions don’t have gaps for example, a rate for $0–$50 and another for $75+, leaving $50.01–$74.99 with nothing assigned.
Shopify’s native settings don’t support item-count-based shipping. You’d need a third-party app for that. Both Intuitive Shipping and Advanced Shipping Rules support item-quantity conditions.

I wrote this guide because “one click checkout Shopify” is one of the most misunderstood searches merchants make, and...

Refunds are part of running any Shopify store. A customer changes their mind, an item shows up damaged, or...

Shopify cart and checkout optimization work together to increase your store’s revenue, yet most merchants fix only one side....